qTest – Overview
|
|
Test management tools are the basic foundation for organizing, tracking, and executing testing activities across the software development lifecycle. They offer a central platform for planning test cases, managing test data, monitoring progress, and generating reports, thereby helping all team members maintain visibility into the quality of the product at every stage.
These tools also promote collaboration amongst QA engineers, developers, and project stakeholders to ensure that testing aligns with project goals and schedules. Moreover, they support traceability between requirements, defects, and tests, providing comprehensive coverage and helping teams quickly identify gaps or issues.
| Key Takeaways: |
|---|
|
What is qTest?
qTest is a comprehensive test management tool application that can be used in the Agile, DevOps, and Waterfall software development processes to manage test cases and execution, as well as defect tracking. It integrates various test automation frameworks, and CI/CD tools can be used to manage not just manual tests but automated ones, too. Utilizing real-time analytics, customizable dashboards, and simple-to-use collaboration facilities, qTest allows teams to increase their visibility and power over their testing process.
Read: Testing Methodologies Uncovered: Propel Your QA Forward.
Core Features of qTest
- Test Case Management: qTest increasingly uses AI to assist with test management activities such as test creation, test coverage improvement, prioritization, reuse, and operational decision-making.
- AI-Based Test Generation: qTest Copilot can generate test cases and test steps from requirements, user stories, source documents, and contextual project information, reducing manual authoring effort.
- Agentic Test Creation: Newer qTest capabilities support autonomous or semi-autonomous test creation, where AI can use requirements, images, prior work, and SDLC best practices to recommend or build reusable test cases.
- BDD Support: qTest supports behavior-driven development workflows, helping teams connect business-readable scenarios with test cases, automation, and requirements.
- Test Execution & Scheduling: Supports scheduling and executing manual or automated tests with real-time tracking of results and progress.
- Automation Integration: Seamlessly integrates with popular test automation frameworks like Selenium, JUnit, and more, providing visibility of automated test results within the platform.
- Defect Tracking: Integrates with tools like JIRA and provides defect tracking capabilities, allowing testers to create and link defects to test executions.
- Agile & DevOps Support: Aligns with Agile methodologies by integrating with CI/CD pipelines and Agile project management tools like JIRA, enabling continuous testing.
- Customizable Dashboards & Reporting: Offers real-time analytics, customizable dashboards, and reporting capabilities to track metrics and ensure test coverage.
- Collaboration & Traceability: Enables collaboration across teams and provides full traceability from requirements to defects, ensuring compliance with industry standards.
- API Integrations: Offers robust APIs for further customization and integration with other development tools and environments.
qTest Architecture & Components
- qTest Manager: It is the central hub used for test case management, requirement mapping, test execution, and defect tracking. It helps teams organize testing activities and maintain end-to-end traceability throughout the software development lifecycle.
- qTest Launch: Used to orchestrate and monitor automated test executions across different automation frameworks and CI/CD pipelines. It centralizes automation results and helps teams manage large-scale automated testing efficiently.
- qTest Insights: Provides advanced dashboards, analytics, and reporting features that help teams monitor quality metrics and testing progress in real time.
- qTest Pulse: Enhances team collaboration by providing activity tracking, notifications, and shared visibility into testing activities. It helps QA teams, developers, and stakeholders stay aligned throughout the project lifecycle.
- qTest Explorer: Supports exploratory testing by allowing testers to capture screenshots, record sessions, and document findings quickly.
- qTest Parameters: qTest Parameters enables parameterized testing by allowing testers to reuse the same test logic with multiple datasets. This reduces duplication and improves test case maintainability and scalability.
- qTest Scenario: Supports behavior-driven development (BDD) and collaborative test design using business-readable scenarios. It helps bridge the communication gap between technical and non-technical stakeholders.
Advantages of Using qTest
- Improved Collaboration: qTest facilitates better collaboration across QA, development, and business teams, bringing them together on one platform where their work can be seen by other users regardless of location.
- Scalability: qTest can grow right along with the team, supporting teams of any size, from smaller groups working on one project all the way up through large enterprises that have many projects spread across various departments. Know more about Test Scalability.
- Flexibility of Methodologies: Although it doesn’t matter if teams follow Agile, Waterfall, or a combination of ways, qTest is flexible. Different workflows can adapt easily. This makes the tool perfect for organizations that transition between or blend methodologies.
- AI-powered Test Optimization: Modern AI capabilities in qTest-integrated ecosystems help teams optimize test execution by identifying high-risk areas, prioritizing critical test cases, and reducing redundant tests. This improves testing efficiency, accelerates release cycles, and enables smarter resource utilization.
- Predictive Defect Analysis: AI-driven analytics can analyze historical test data, defect trends, and execution patterns to predict potential failure points before production. This proactive approach helps QA teams focus on high-impact areas, improve defect prevention, and enhance overall software quality.
- Ease of Use: The user-friendly interface and intuitive design of qTest make it easy for new users to adopt, reducing the learning curve and accelerating productivity for testers and developers alike.
- Compliance & Audit Readiness: qTest supports industry-specific compliance standards by providing audit trails, traceability, and detailed reporting that is critical for regulated industries such as the healthcare and finance sectors.
qTest – Overview
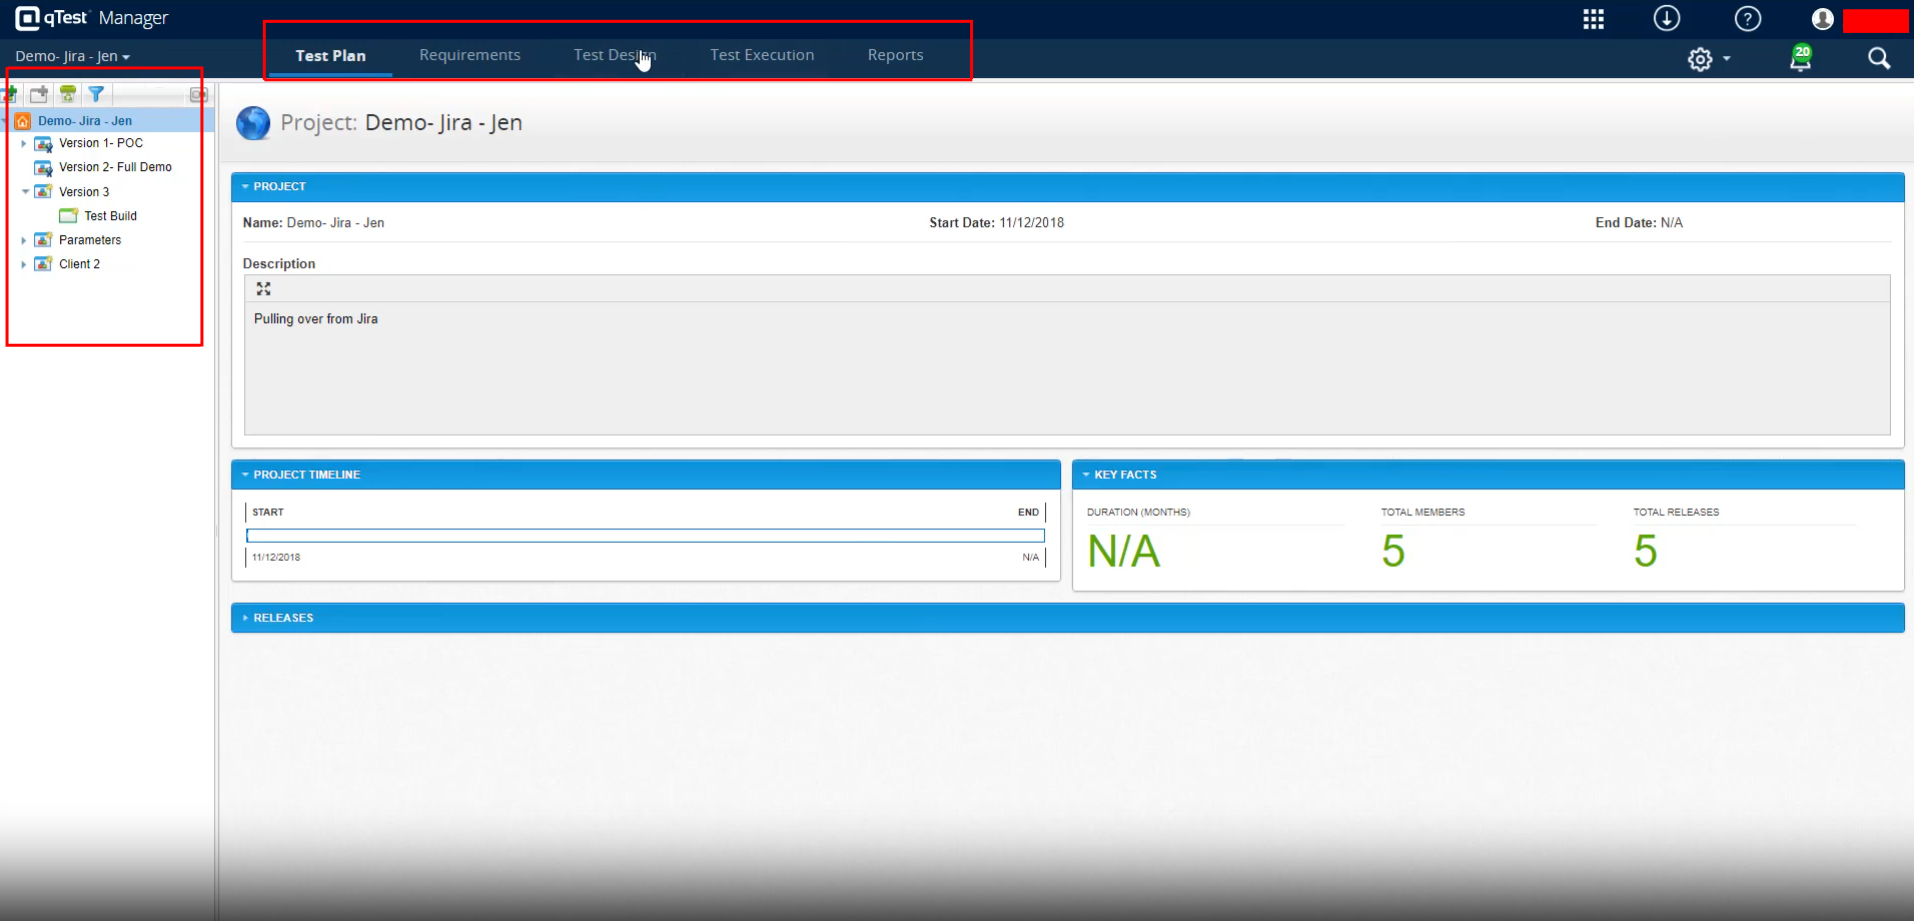
Once you log in to qTest, you can see the list of projects on the left-hand side tab. Also, in the center, you can see the project statistics. On the top, you can see different tabs, including Test Plan, Requirements, Test Design, Test Execution, and Reports.
Creating a Test Case in qTest
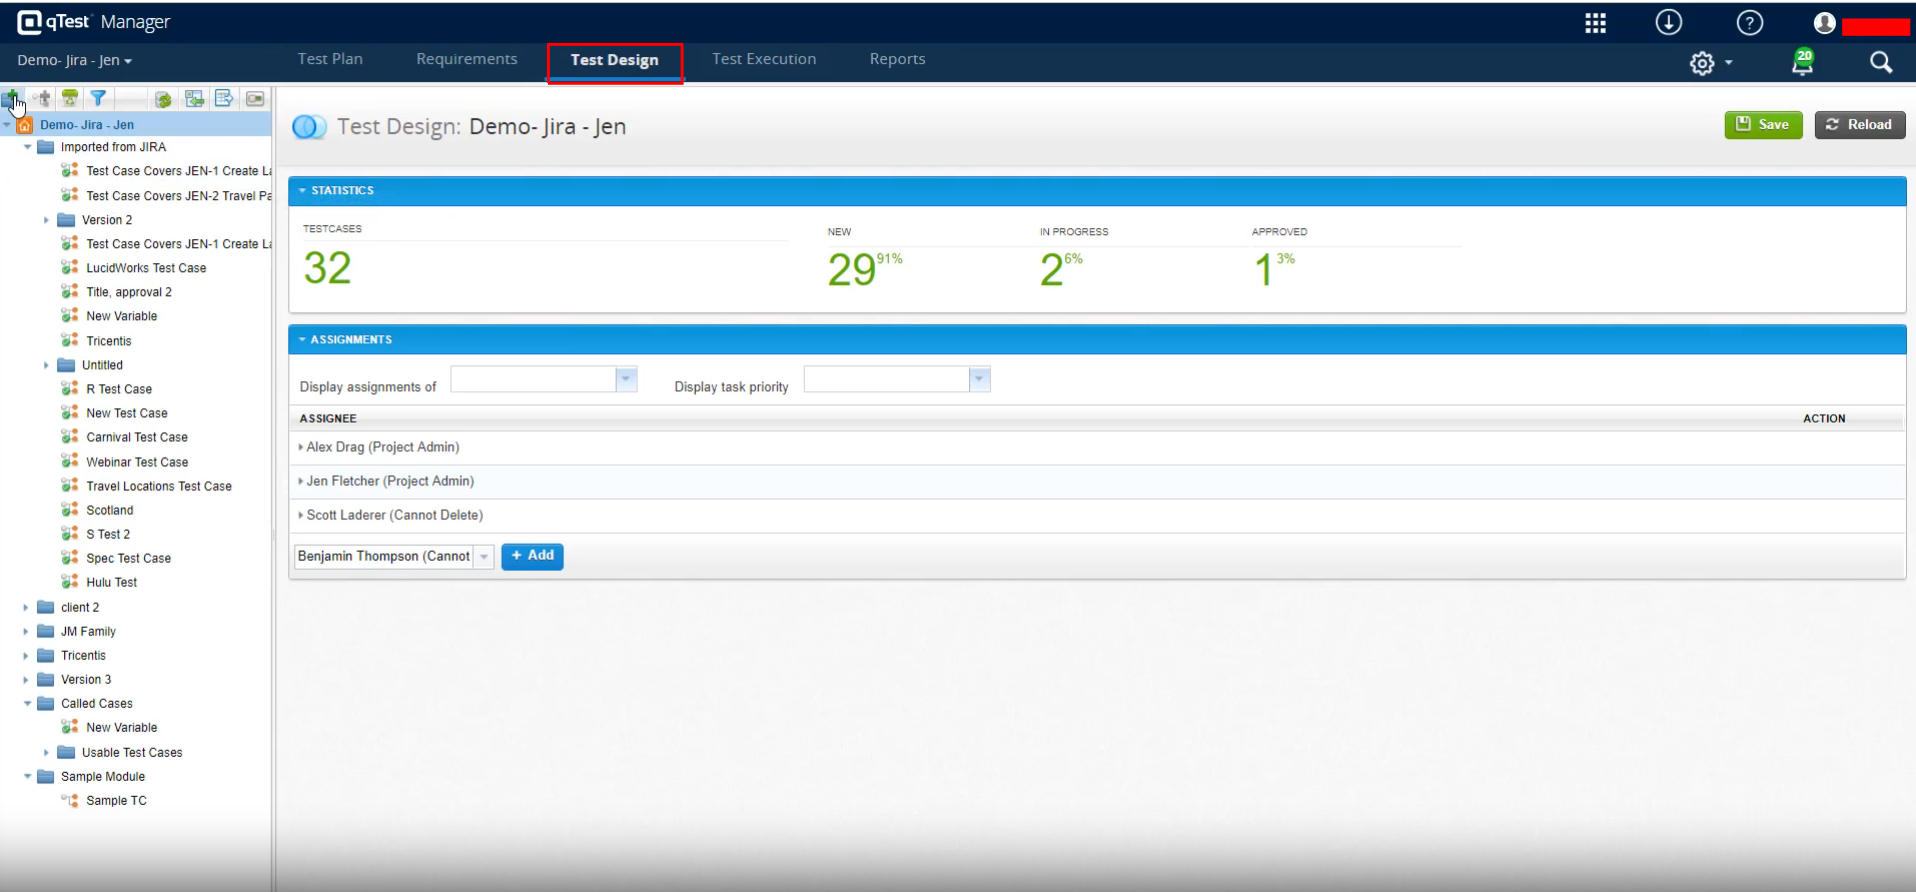
Step 1: To create the test case, first, we need to navigate to the Test Design tab at the top.
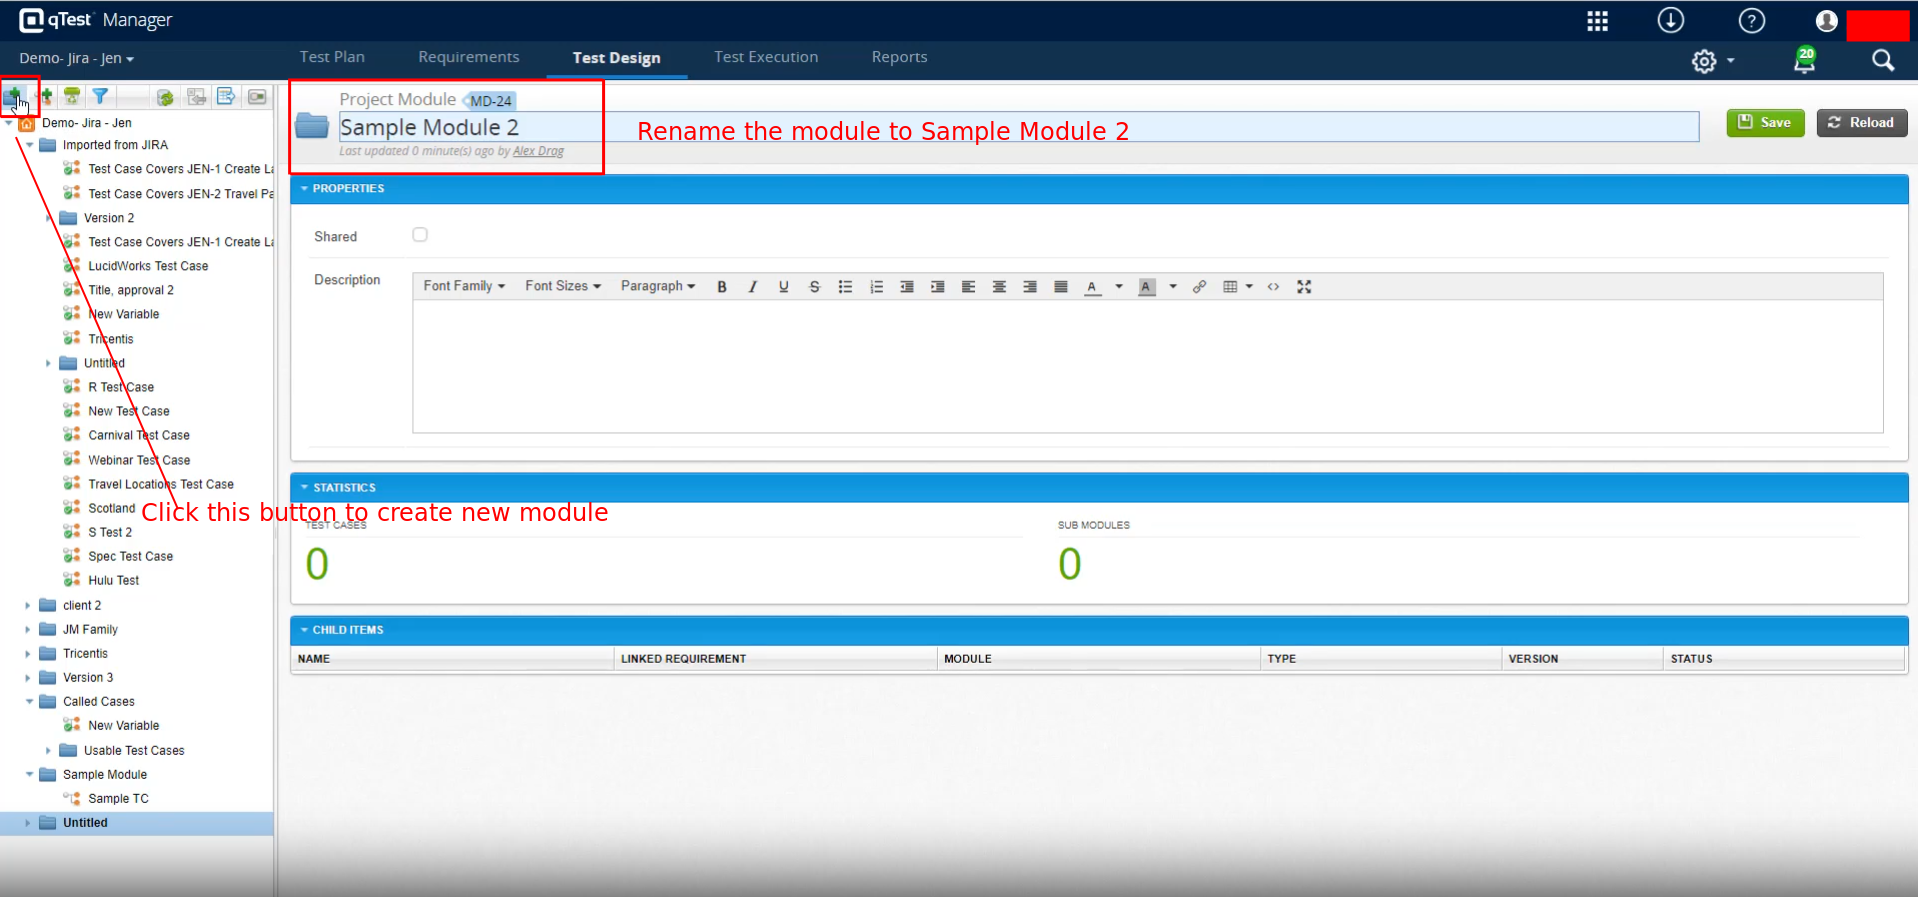
Step 2: Usually, test cases are created inside the modules. So, before creating the test case, we need to create a module. To create a module, click on the folder icon with a plus mark on the left side menu.
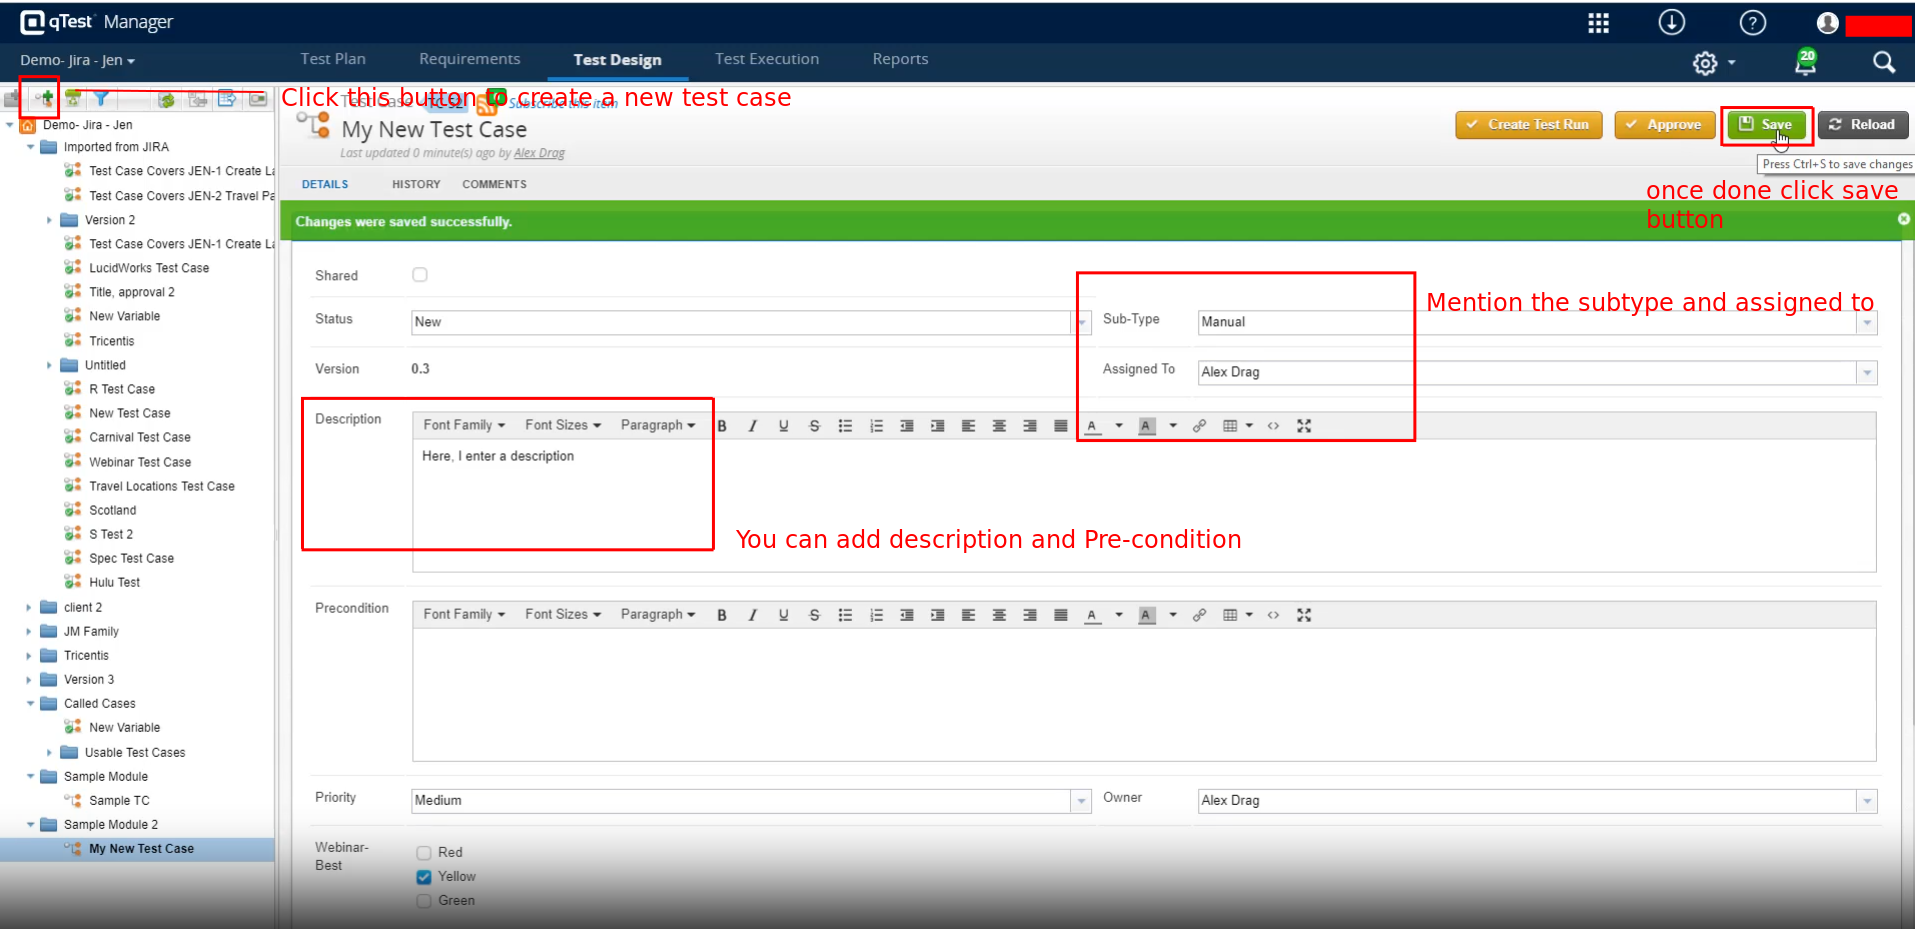
Step 3: Next, we need to create the test case. Click the New Test Case icon on the left side menu to do that. The new test case page will open. You can add the Description, Precondition, Sub-Type, Assigned to, etc. Once you add the details, click the Save button.
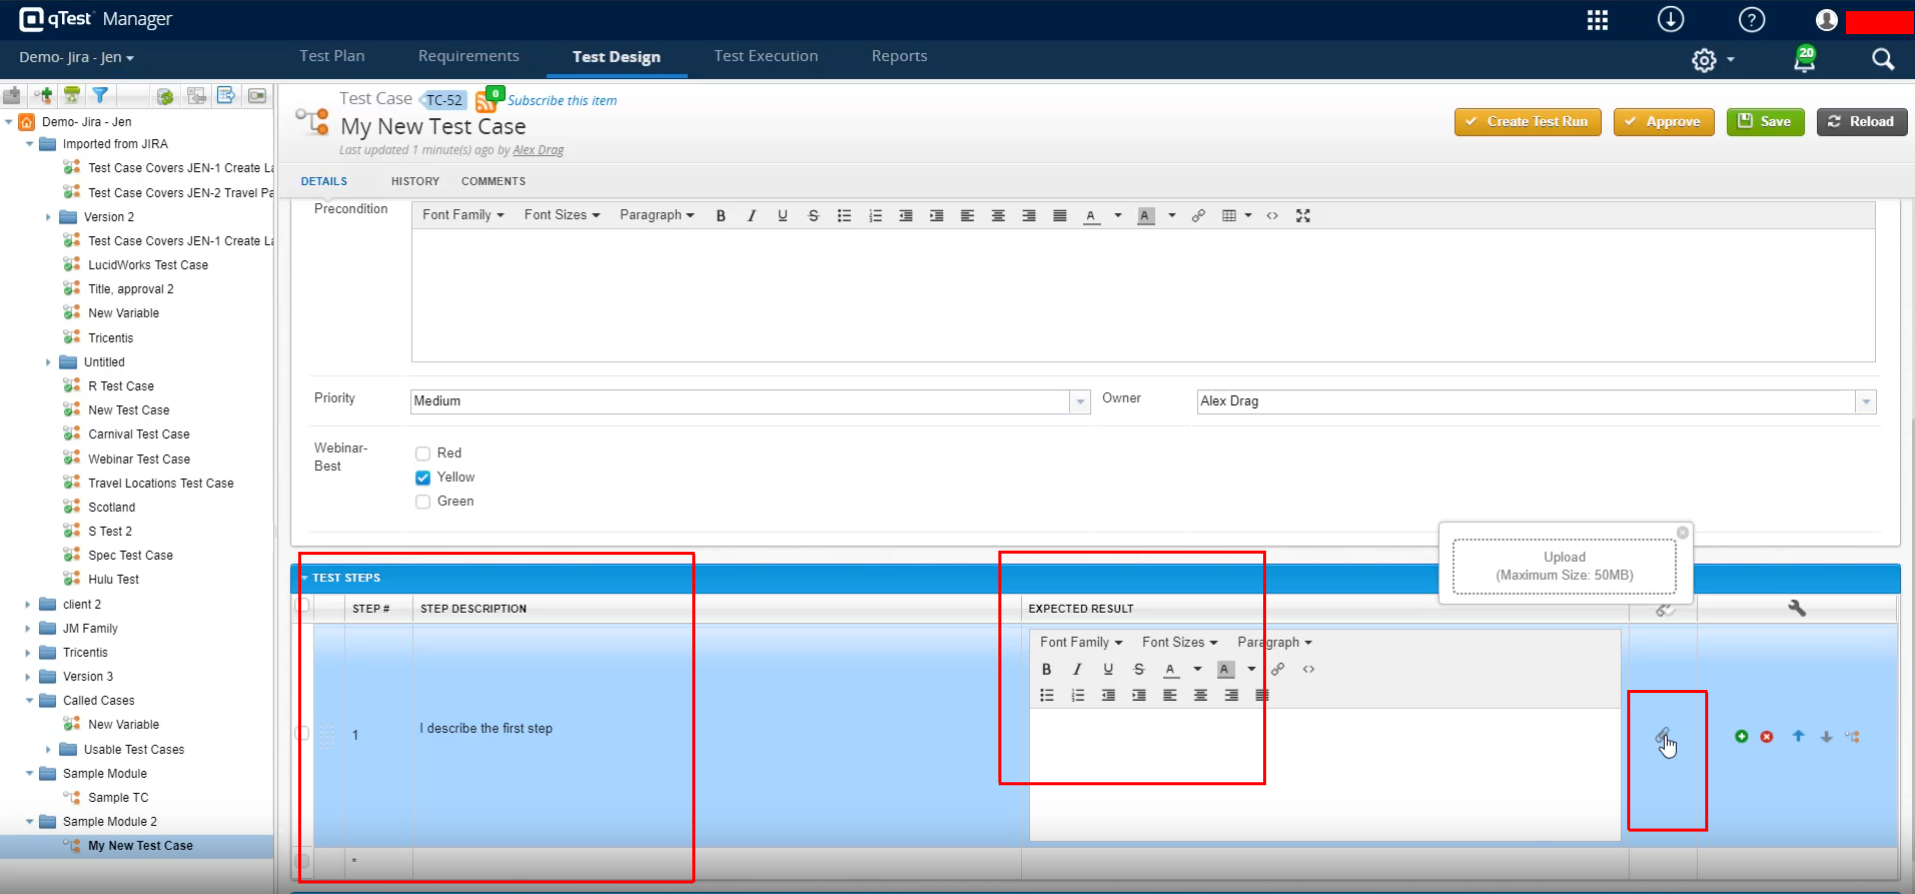
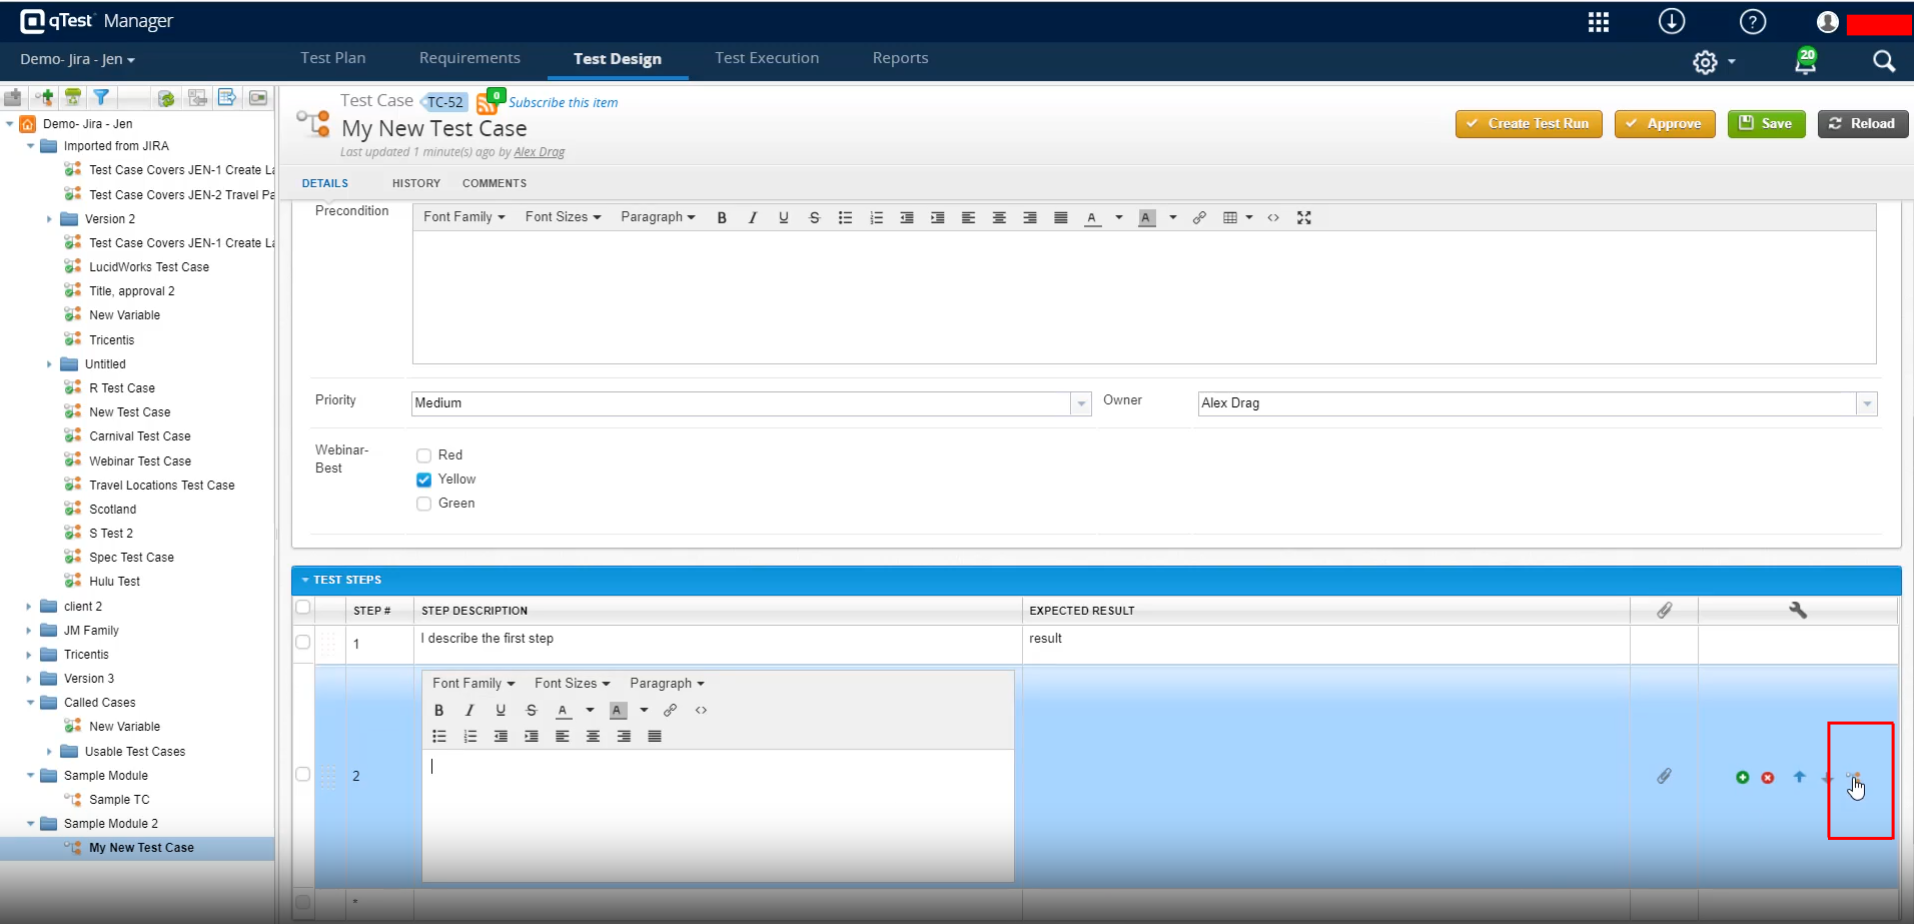
Step 4: Now, let’s see how to add Test Steps. So, on the test case creation page, scroll down to see the option to add Test Steps. You can add the step description and the expected result. Similarly, you can add multiple steps. Also, if you need to attach some files, like a test data sheet for any particular step, you can do so.
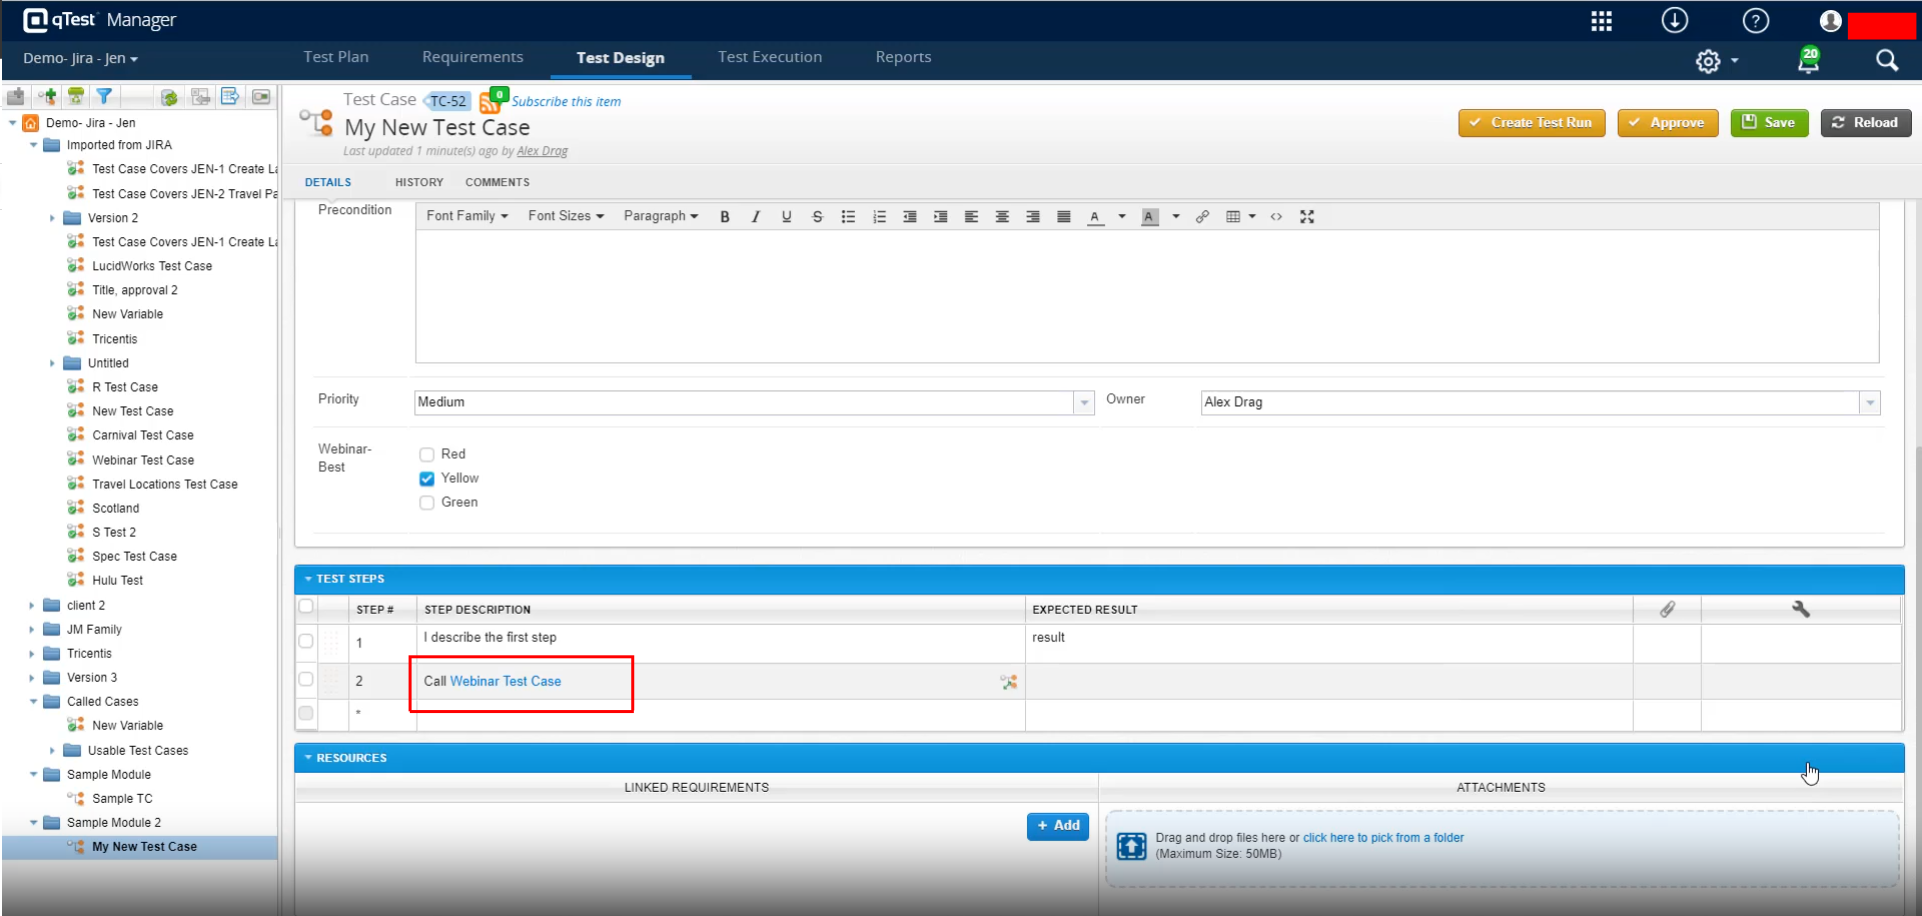
Linking another Test Case
Step 5: If you need to add another test case, which may be a common one, you can do that by clicking the Call Test Case icon from a new Test Step.
Step 6: Once you click that icon, a pop-up will appear, and you can select which test case needs to be added. Select and click Add.

Step 7: Once added, the test case will be displayed like a link.
Linking Requirement
Step 8: Similarly, to map requirements to a test case, you can click the Add button on the Linked Requirements tab and then select the requirements from the pop-up.
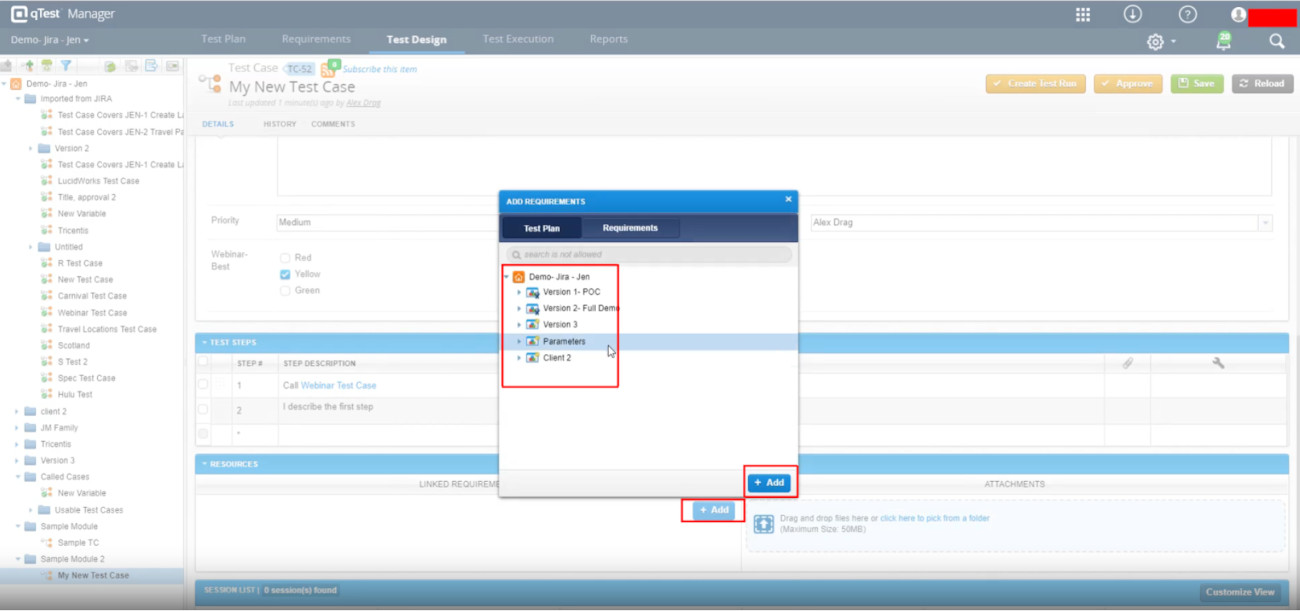
Once all is done, click the Save Button.
Generating Test Cases Using AI
- Enable AI Features: First, ensure the AI integration is enabled at the site level and the ‘AI Generated Test Cases’ feature is toggled on in your specific project’s settings.
- Open a Requirement: Go to the ‘Requirements’ tab in qTest Manager and open the requirement or user story you want to test.
- Generate with AI: Locate the ‘Create Associated Test Cases’ section (or the upper toolbar) and click ‘Generate with AI’ (or Write test cases with AI).
- Refine and Customize: The AI will draft up to 10 context-rich test cases along with preconditions, steps, and expected results. Use the ‘Customize’ menu to adjust, elaborate, summarize, or regenerate specific steps.
- Add to Test Design: Review the generated content, select the checkboxes for the test cases you want to keep, and click ‘Add Test Cases’ to save them to your ‘Test Design’ repository.
Test Execution in qTest
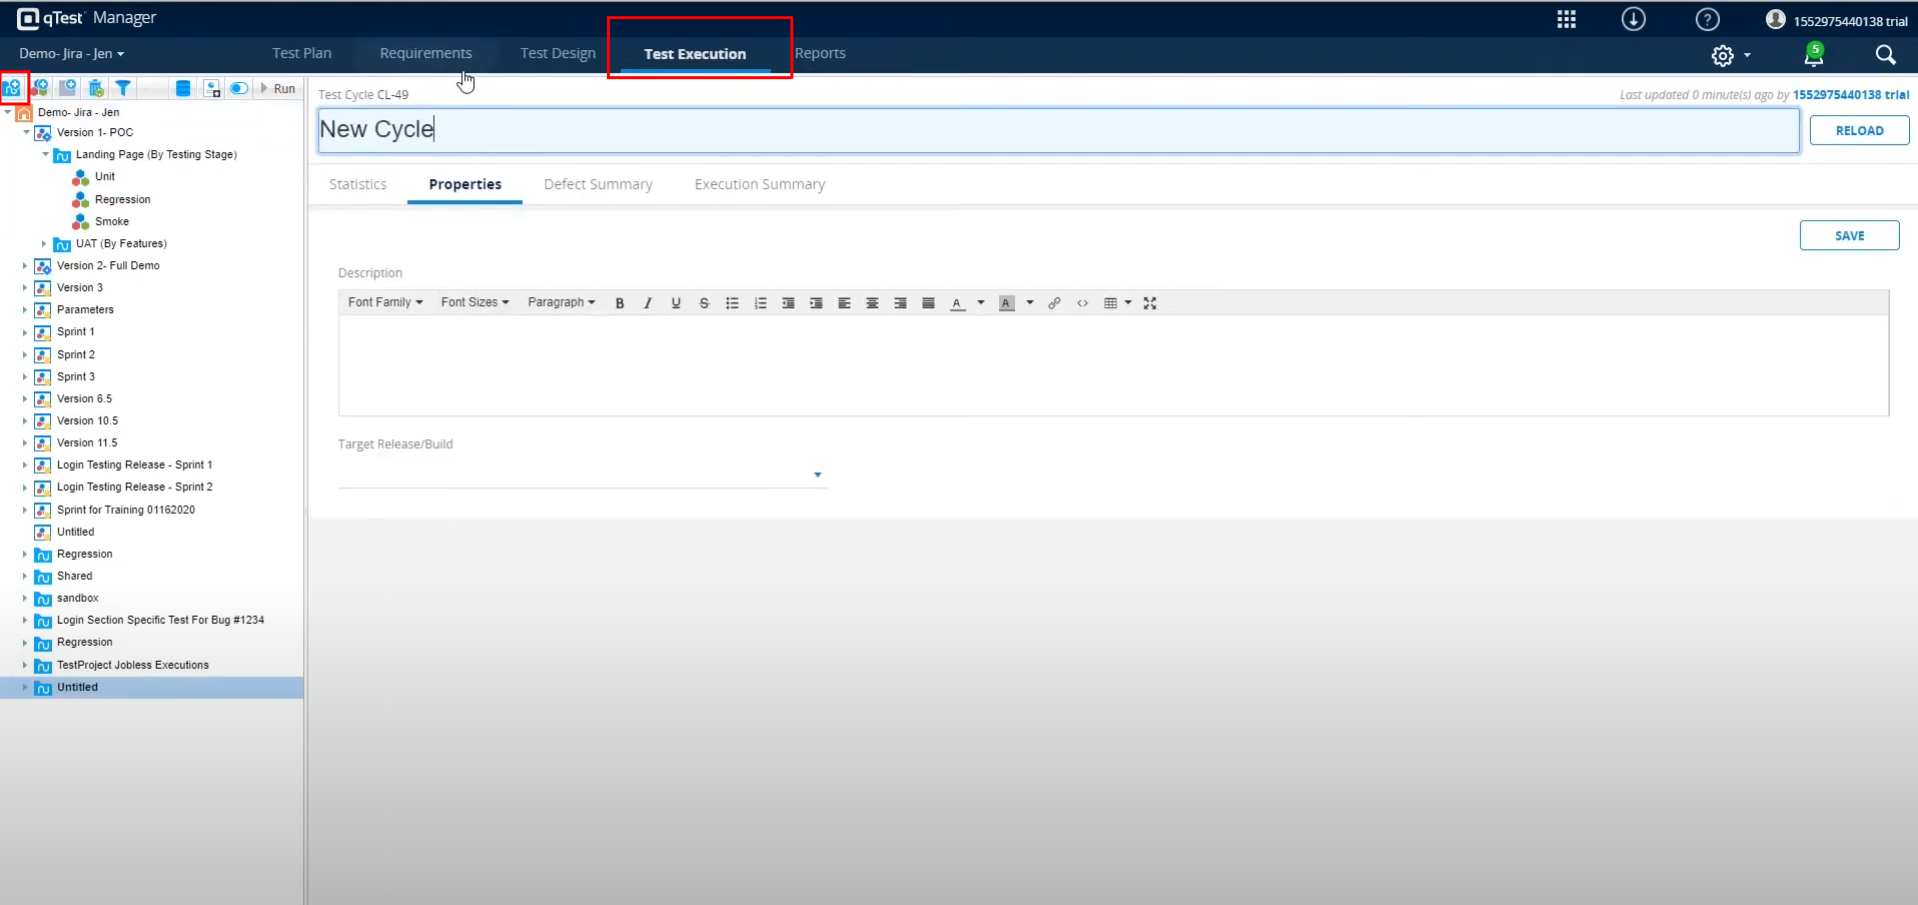
Step 9: To execute the test cases, we first need to create the Test Cycle. To do so, navigate to the Test Execution tab and click the New Test Cycle Icon. Add a name for the test cycle and click Save.
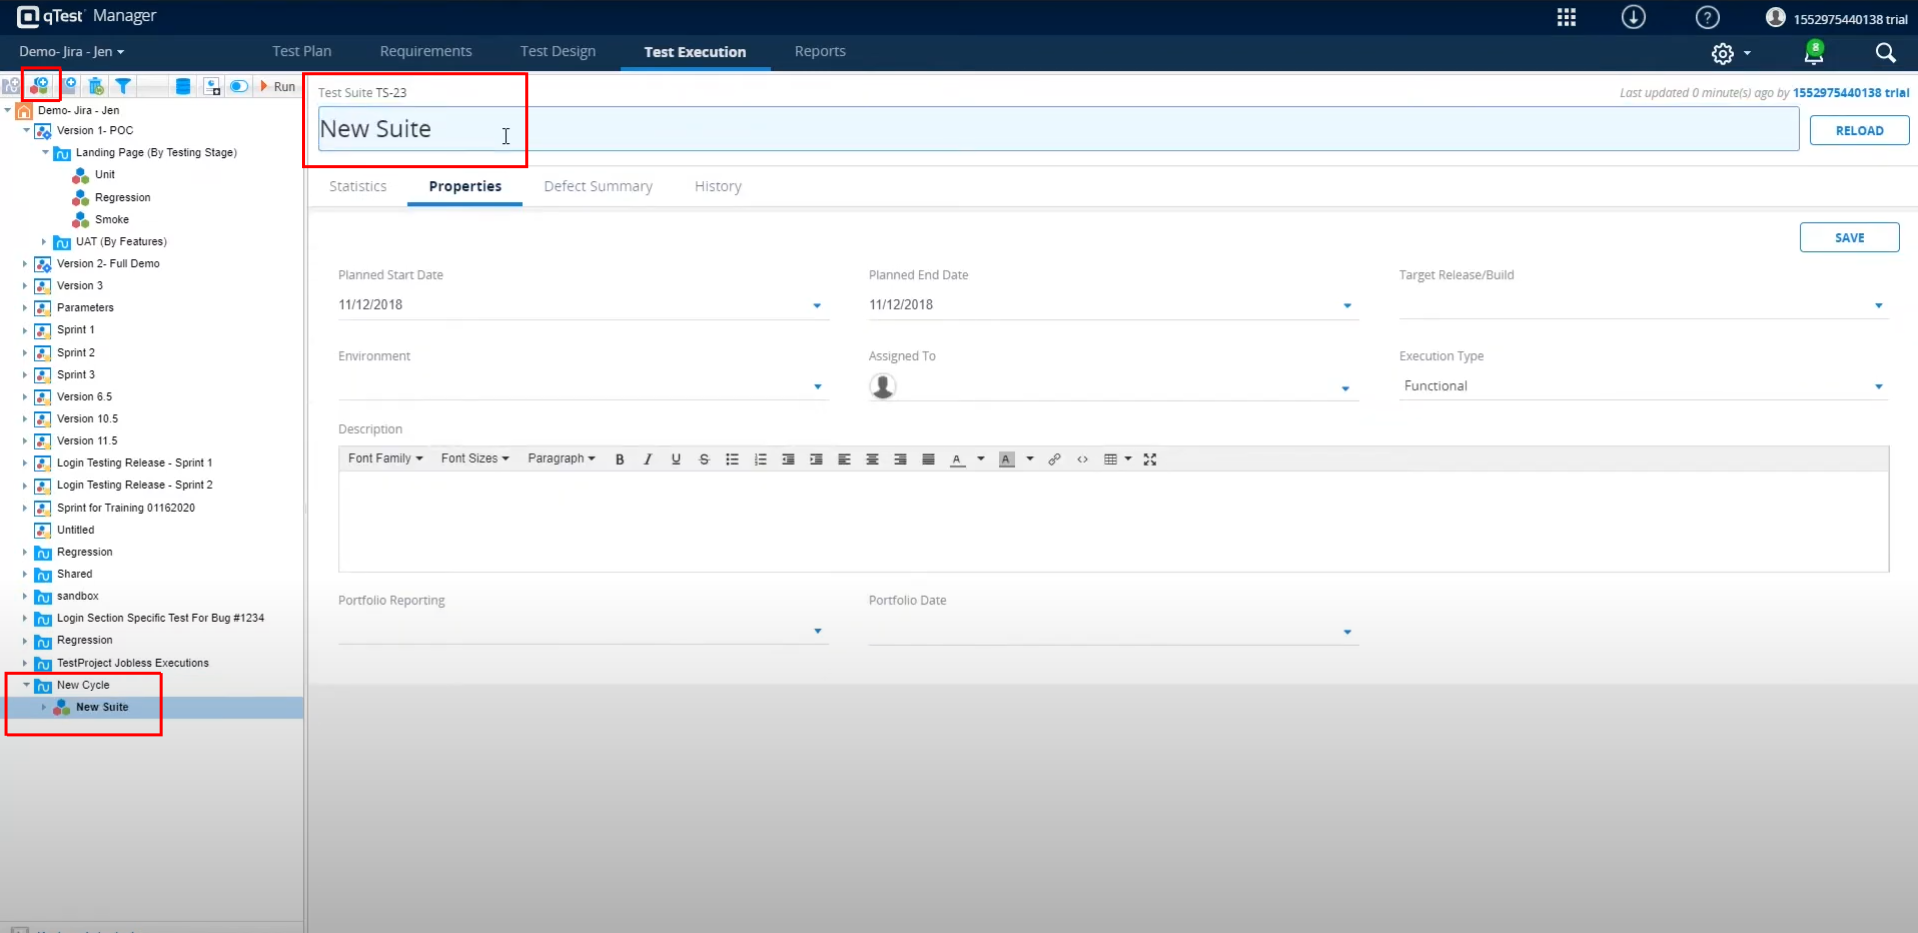
Step 10: Next, we need to create the Test Suite. Click the New Test Suite icon on the left-hand panel. The new test suite will be displayed under the test cycle.
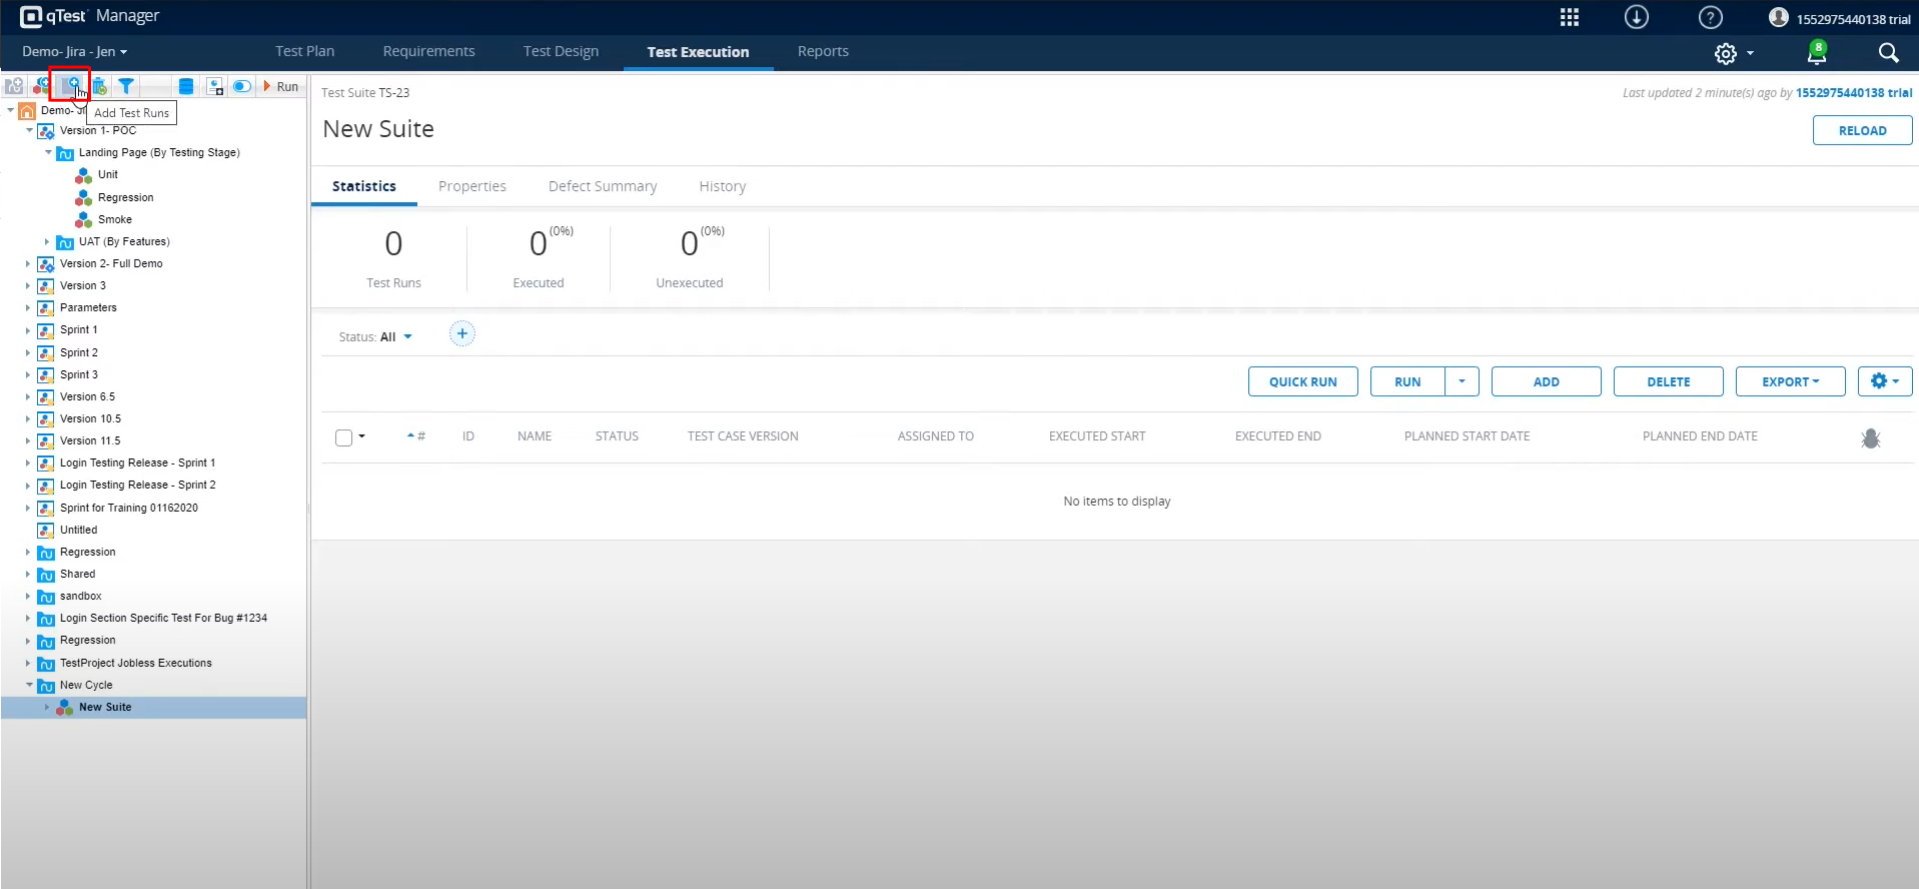
Step 11: Next, we need to add test runs. To do that, click the Add Test Runs icon on the left-hand menu.
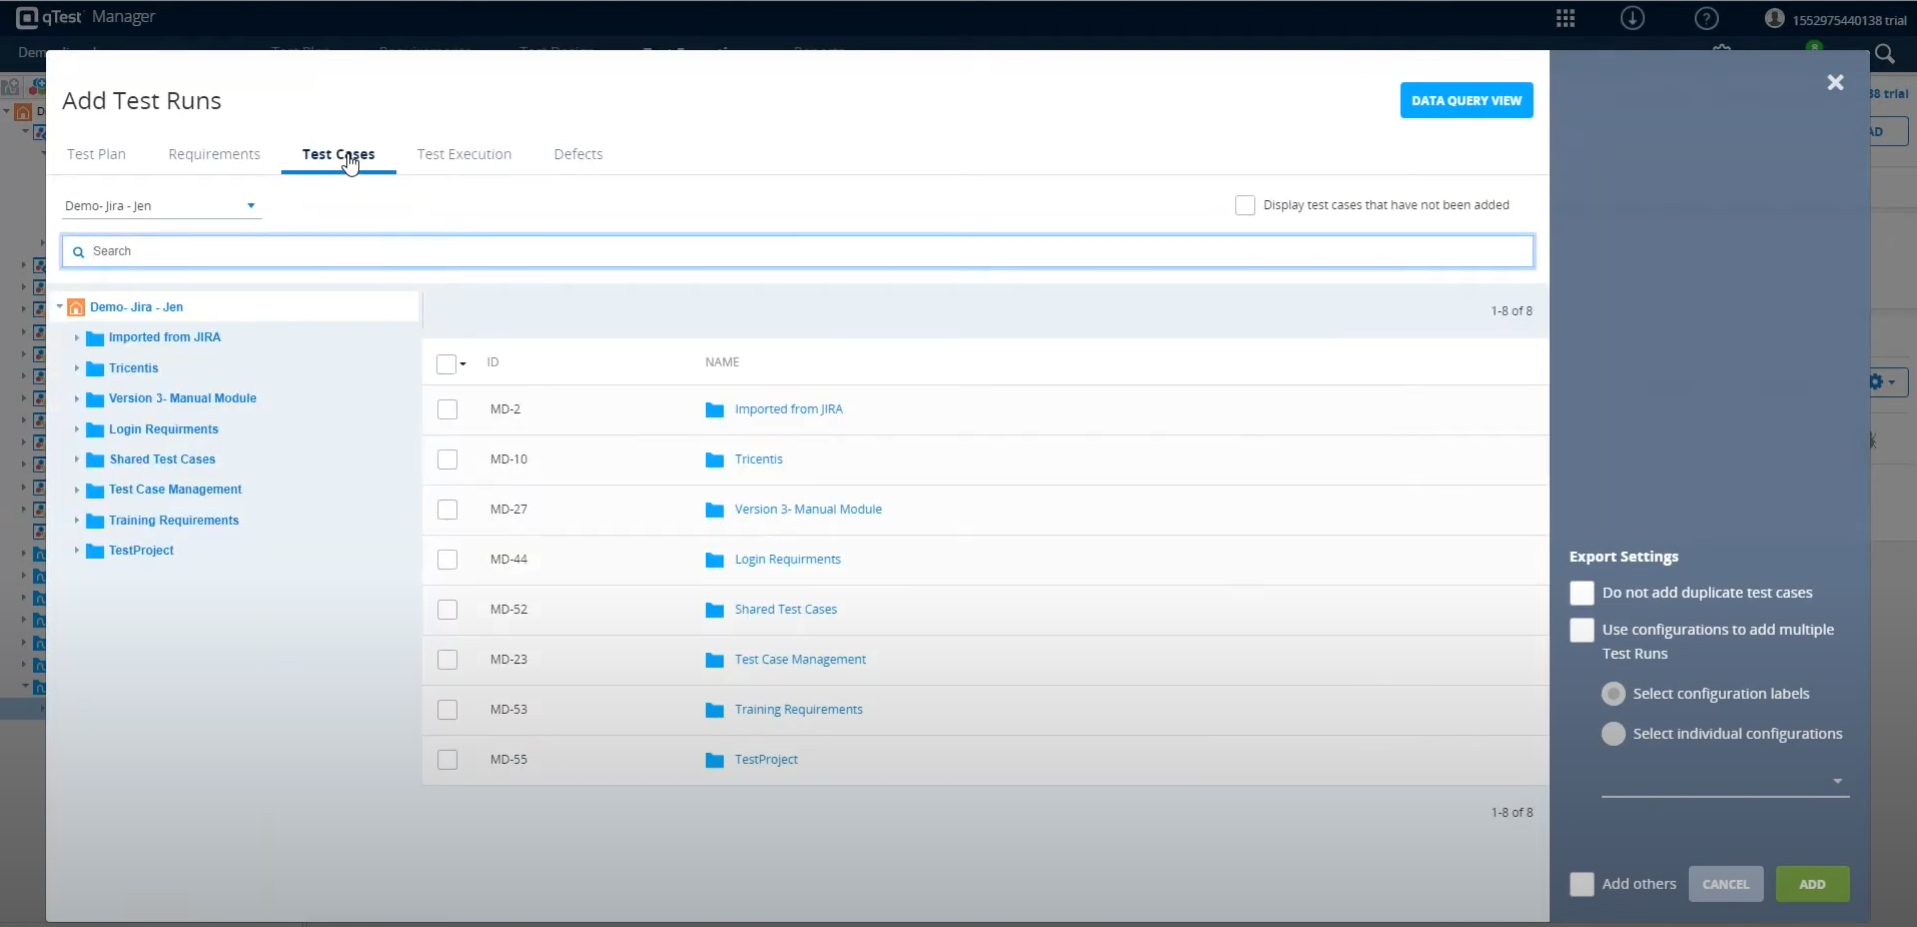
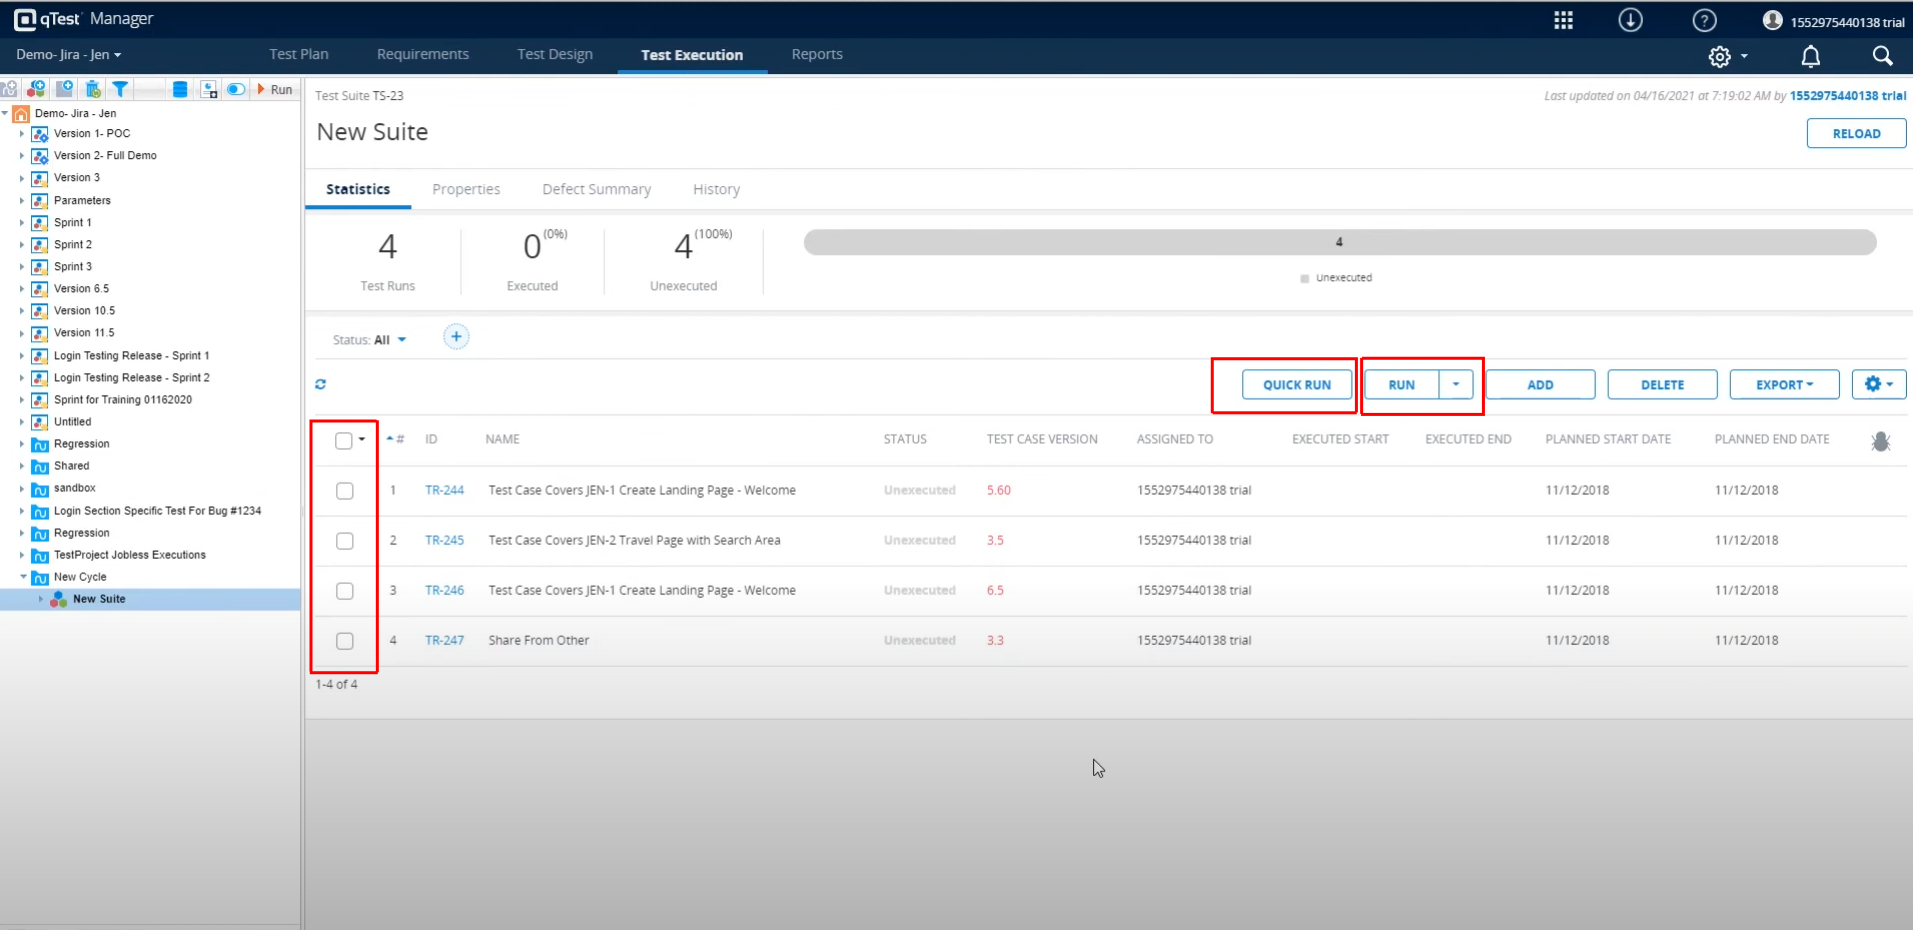
Step 12: Now, the Add Test Runs pop-up will appear. You can add test cases from the Test Plan and Requirements or import test cases from the Test Cases module.
Step 13: The selected test cases will be displayed in the Test Suite. You can execute the test cases by selecting them and clicking either the Run or Quick Run button.
- Run – Executes test cases sequentially.
- Quick Run – You already executed the test cases; now, you just need to update the results as a batch.
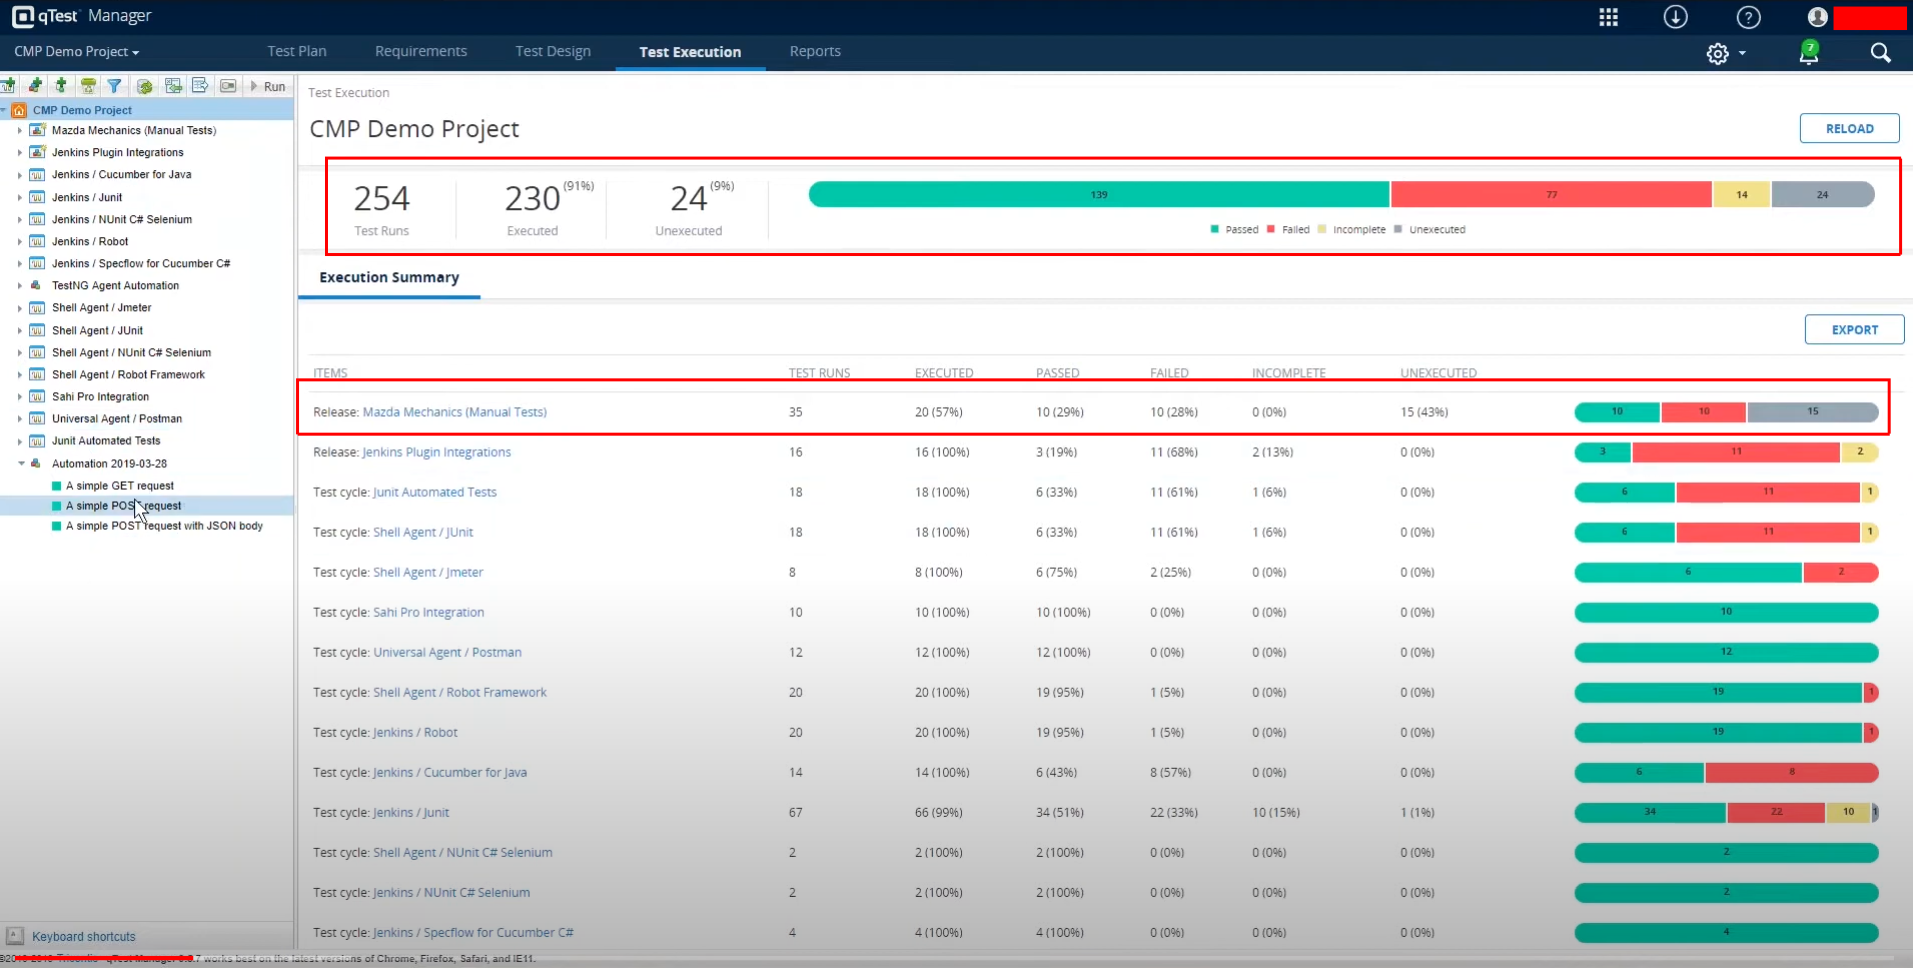
Viewing Test Results in qTest
Test results can be viewed for each test suite. If you have multiple test cycles under the suite, you can view the result of each cycle and the overall details of the test suite.
qTest – Pros & Cons
Let’s understand the advantages and limitations of using qTest.
| Pros | Cons |
|---|---|
|
|
Test Automation with AI-based tools
While test management tools like qTest are helpful, they are not enough. If you truly want to automate your testing, you need to use tools that can manage and execute your test cases as well. Of the many test automation tools available in the market, the one that can help you the most is testRigor.
testRigor with Generative AI
testRigor is a one-of-a-kind test automation tool that makes test case writing, executing, and maintaining easy. This tool allows you to easily create test cases in plain English (or any other natural language) statements. This is because testRigor uses generative AI to take it upon itself to decipher what the user intends, making it like a human emulator or AI agent. Read about AI Agents in Software Testing.
With this intelligent tool, you can write various types of functional, end-to-end, regression, sanity, API, UI, and system tests. These tests can verify different types of apps/platforms/scenarios, including the web, mobile (hybrid, native), desktop, API, database, file handling, QR code, Captcha resolution, email, phone, SMS, 2FA, and many more in just plain English.
That’s not all; testRigor uses advanced AI to reduce test maintenance overhead, thus allowing you to focus on creating test cases. Read more about Self-healing Tests.
Migrating qTest Test Cases into testRigor
Unlike qTest, which primarily focuses on test management with AI-assisted capabilities, testRigor’s Gen AI is built specifically for simplifying and accelerating test automation. If your test suites already exist in qTest, you can easily move them into testRigor by copying the test cases directly into its editor and converting them into automated tests with minimal effort.
testRigor’s Generative AI can intelligently understand plain English test steps and automatically transform unclear or complex statements into reusable rules, similar to shared steps in qTest. These reusable rules are also written in plain English, making them easy to understand, maintain, and reuse across projects. In many cases, testRigor can even generate these rules automatically for you, reducing manual work significantly.
This approach makes automation more accessible not only for automation engineers but also for manual testers, business analysts, and non-technical team members. Compared to qTest’s AI features, which are more centered around reporting and test management assistance, testRigor’s Gen AI places a stronger emphasis on autonomous test creation, maintenance reduction, and plain-English automation. Here’s an example.
Let’s say that your qTest test case has a statement like ‘Checkout from cart’. When testRigor’s engine tries to comprehend this, it will classify it as a reusable rule. Now, you can choose to either define this rule by yourself in plain English or let testRigor do it for you using generative AI.
click on “cart”
scroll down until page contains "Checkout"
click on “Checkout”
click on “Continue”
Now, wherever you have the statement ‘Checkout from cart’, testRigor will execute this set of steps. You can modify these steps at any point, and the change will be reflected in all test cases.
Here is a detailed guide explaining how to migrate the test cases from qTest to testRigor. You can read and follow the steps: Migrate Your Test Cases from qTest to testRigor.
That is not all. You can do a lot more with this tool, here’s a complete list of testRigor’s powerful capabilities.
Frequently Asked Questions (FAQs)
- Can qTest replace automation tools?
No. qTest is primarily a test management platform, not a complete automation framework. Organizations still require separate automation tools for actual test execution. qTest mainly helps organize, track, and report testing activities, though it has introduced test generation capabilities now.
- How secure is qTest for enterprise usage?
qTest offers enterprise-level security features including role-based access control, audit trails, secure authentication, and compliance support, making it suitable for regulated industries like healthcare and finance.
- Can qTest handle large enterprise-level projects?
Yes. qTest is designed for scalability and can support thousands of test cases, multiple teams, large releases, and enterprise-wide QA operations.
| Achieve More Than 90% Test Automation | |
| Step by Step Walkthroughs and Help | |
| 14 Day Free Trial, Cancel Anytime |


