Generative AI-Based Testing Certification
Settings
- Authentication: Configure access and login credentials.
- Proxy: Connect testRigor to private or restricted environments.
- Speed Optimizations: Control test execution speed and behavior.
- Error Reporting: Configure additional errors for testRigor to detect.
- Integrations: Connect testRigor with external tools and services.
- Test Generation: Configure how test cases are automatically generated.
- Advanced Settings: Customize additional testing behaviors and configurations.
You can modify the test suite name in General.

Authentication
Basic/Digest HTTP Authentication
App-specific Authentication
In order to establish the default username and password needed to log into the application, fill in the fields provided. These credentials will then be used as the built-in variables username and password. This allows testRigor to use its built-in login rule.
Proxy
When a website is not publicly accessible, testRigor needs a way to access the environment. The best way to do this is to whitelist our static IPs. However, there are several alternatives to connect. Some companies have a VPN or proxy that they can provide in the fields provided in this section.
Another way is via tunneling, which is essentially a reverse proxy. This involves the user installing a small program onto a server that has access to the environment that needs testing. This server acts as a with the user environment and testRigor servers. Users need to work with testRigor agents in order to configure this type of connection.
Speed optimizations
Speed optimizations is broken up into two categories: (1) Timeouts and Delays and (2) Performance.
Timeouts and Delays
Performance
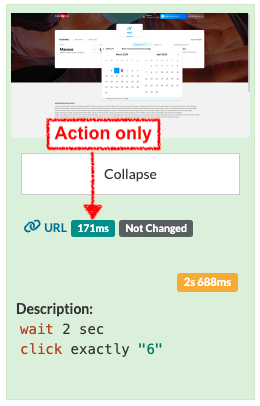
- Measure page load: Measures how long a page takes to load by detecting when the page stops changing.
- The result appears under
More details...below the screenshot when available. - By default, the displayed time only shows how long the action itself took.
- When enabled, the displayed time includes both the action time and the time spent waiting for the page to finish loading.
- The time this adds is significant, so if it is not strictly necessary, this setting can be disabled to improve single execution and full retest run times.
- The result appears under
 |
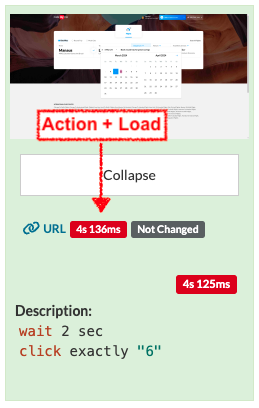 |
Measure page load disabled (left) and Measure page load disabled enabled (right)
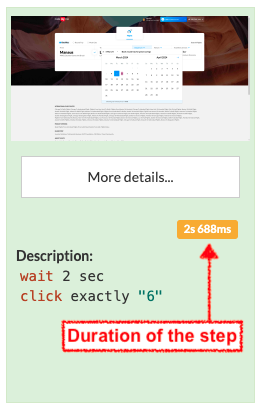
- Measure time between steps: This setting allows testRigor to display the duration of each step below its respective screenshot.
 |
- Wait for scripts: Forces testRigor to wait for scripts to load before checking whether the DOM is ready. However, even after the scripts have loaded and the DOM is ready, those scripts may still be fetching or adding additional content to the page. This means the page may not be fully loaded yet.
- Allow parallel testing: When enabled, testRigor can run multiple test cases from the suite at the same time. This is the default mode. When disabled, test cases run one at a time.
- Maximum number of parallel servers (up to 10000): Determines how many servers can run test cases at the same time. Since each server runs one test case at a time, setting this to 5 allows up to 5 test cases to run simultaneously. The maximum number of servers available depends on your plan.
- Maximum parallel batch size: Determines how many test cases are assigned to each server at a time during a full retest.
Server 1 → Tests 1–5
Server 2 → Tests 6–10
Server 3 → Tests 11–15
Server 4 → Tests 16–20
Larger batch — 4 tests per server
Server 1 → Test 1 → Test 8 → Test 2 → Test 3
1 min 20 mins 1 min 1 min
Server 2 → Test 4 → Test 5 → Test 6 → Test 7 → Idle
1 min 1 min 1 min 1 min
Total execution time: 23 minutes.Smaller batch — 1 test per server
Server 1 → Test 8 → Idle
20 mins
Server 2 → Test 1 → Test 2 → Test 3 → Test 4 → Test 5 → Test 6 → Test 7 → Idle
1 min 1 min 1 min 1 min 1 min 1 min 1 min
Total execution time: 20 minutes.- Strategy for reading screen information: Controls whether AI agents re-read the entire page after entering a value. This is useful when entering information causes the page to change automatically, but may slow down test execution.
- Determining visibility of web elements: These settings determine how testRigor views and interacts with elements on the page. It’s important to choose the appropriate mode from the beginning, since test cases built using one mode may fail when switched to the other. There are two options:
- Visible first: The default mode. testRigor behaves more like a user by focusing on elements that are visible within the viewport.
- Batched mode: testRigor can detect and interact with elements loaded in the DOM, even if they are not currently visible within the viewport/screen.
- Maximum number of retries for failed tests: Allows testRigor to automatically retry a failed test case 0, 1, or 2 times. This can help when a test fails because of a temporary issue rather than an actual bug. For example, two test cases might try to use the same resource at the same time, causing one to fail. Retrying gives the test another chance to run once that resource is available.
- Prioritize clicking on: This determines what type of elements testRigor looks for on
clickcommands.- Only buttons: testRigor considers links, images, buttons, and anything else that changes the mouse pointer to a pointer finger when hovered over as “buttons”. These are what testRigor looks for when a
clickcommand is used. - Switches and buttons: Checkboxes and toggles fall into the category of switches. This setting allows testRigor to prioritize these on the same level of buttons on
clickcommands.
- Only buttons: testRigor considers links, images, buttons, and anything else that changes the mouse pointer to a pointer finger when hovered over as “buttons”. These are what testRigor looks for when a
- Auto-scrolling: Controls when testRigor automatically scrolls to an element before interacting with it. Auto-scrolling can also be bypassed for an individual command by adding
without scrolling. - Span treatment: This setting is to determine whether users want testRigor to recognize nested spans the same way it reads labels.
Error Reporting
Integrations
testRigor has the ability to integrate with the following tools. For most integrations, users will need to provide working account credentials with these tools.
Video recording of test cases: Enable and disable the video recording. No account connection or extra key is necessary.
Test case management tools: Azure DevOps, TestRail (two-way execution), Zephyr (Enterprise, Scale), HipTest, Xray Cloud, Report Portal
Issue reporting: Jira, Pivotal Tracker, Azure DevOps
SMS and phone calls: Twilio (send and receive sms and calls)
3rd-party Infrastructure Providers: LambdaTest, SauceLabs, BrowserStack, and Kobiton
Database connections: MySQL, PostgreSQL, SQL Server, Snowflake, and Grid Gain
Alerts: Pager Duty
Chrome Extensions: This is intended to test a Chrome extension developed by your development team as it requires the original extension file.
Test Generation
Test generation is simply the different ways that testRigor automatically builds test cases largely without human intervention. Each method has its pros and cons.
AI-Based Test Generation
The best use of AI to build test cases requires a detailed description of the application that it will interact with. Test case creation and self-healing are advantages of AI-based test creation. However, because AI is programmed to complete flows, it may attempt workarounds in certain scenarios where reporting a bug would be the preferred course of action.
Behavior-Driven Test Generation
Behavior-driven test creation uses analytics to determine how users interact with your application. It takes the most common scenarios and builds test cases based on them. Test cases built with this feature are tagged with the label Recorded. This helps companies learn there users’s behavior, but it doesn’t guarantee that this will increase test coverage of the features they know they want to cover.
Crawler-Based Test Generation
Crawlers go through the UI of an application and perform random actions on any button or field on the page. The actions that crawlers perform can be nudged with rules, settings, and default values for discovery, but they remain random for the most part. This increases coverage, but again, there is no guarantee that the scenarios will be useful.
Advanced section
The “Advanced” section houses settings for processing newly opened tabs, iframe depth, time zones, and other options. We offer checkboxes for enabling synonyms, OCR recognition, deepest element prioritization, inner child button location, OS and browser version on executions, and browser and HTTP request collection.
iframes
Synonyms
Element ‘Well’ found by synonym ‘good.’