Shopify Testing

Shopify reported a total revenue of $7.1 billion for the year 2023. Shopify serves a broad range of users, from solo entrepreneurs and small businesses to large enterprises and everything in between. It is a comprehensive e-commerce platform allowing individuals and companies to create and manage online stores. Shopify has around 4.80 million live online stores as of January 2024.
Shopify supports various types of apps that cater to a wide range of e-commerce needs, enhancing the functionality of Shopify stores. These apps are broadly categorized into two main types based on their integration method with the Shopify platform: Public Apps and Custom Apps. Additionally, a newer category known as Shopify Functions allows for deeper customization of Shopify’s core features.
If you are a merchant setting up a Shopify store, you must test that the store is working correctly. There are over 8,000 apps for all the different ways you want to customize your store. If you are using any of the Shopify apps, then that integration should provide relevant results.
If you are a developer who is writing code for these apps, then you should also test your individual app and the integrations with Shopify apps that a merchant/customer might use. The reason is that the app goes through a 100-checkpoint review before being approved and available in the Shopify app store.
Since the business depends solely on this, many facets of Shopify testing must be covered for a seamless integration and user experience. In this article, we will try to explore all these areas: how to test a merchant’s Shopify store, the developer’s Shopify app, Webhooks integration, and the integration of everything.
Shopify Store Testing
Shopify stores are online storefronts created using the Shopify platform. They are designed for entrepreneurs and businesses to sell products or services to customers online. The core functionality of Shopify stores includes product listing, inventory management, payment processing, shipping configuration, and customer relationship management.
Target Users:
- Targeted primarily at merchants and entrepreneurs who want to sell online, whether they are selling physical goods, digital products, or services.
- Suitable for a wide range of businesses, from small startups to large enterprises.
Customization and Expansion:
- Shopify stores can be customized using themes that change the look and feel of the store and apps that add specific functionalities, such as email marketing tools, SEO apps, and product review managers.
- Merchants can use Shopify’s admin interface to manage their store, add products, process orders, and much more.
The following testing types are beneficial to ensure the Shopify Store works as expected:
Functional Testing
- Navigation and Layout: Verify the store’s layout, menus, and navigation links on different devices to ensure they work as intended.
- Product Pages: Check if product descriptions, images, pricing, and add-to-cart functionality work correctly.
- Checkout Process: Walk through the entire checkout process to ensure it is seamless. Test different payment methods, including credit cards, PayPal, and any other options you offer. Read an article about online credit card generators here.
- Account Creation and Management: Test creating a customer account, logging in, updating details, and recovering passwords.
- Order Processing: Place test orders to ensure a smooth process from checkout to order confirmation.
- Shipping and Fulfillment: Test your shipping setup and fulfillment processes, including notifications, tracking, and returns.
-
Payments: Utilize ‘Shopify Payments Gateway’ (available in the paid plan using test mode) or ‘Bogus Gateway’ (free plan) to test payments without processing actual transactions.
- Activate Bogus Gateway: Settings > Payments > See all other payment providers
- Activate Shopify Payments Gateway (Test Mode): Settings > Payments > Manage > Enable Test Mode
User Interface (UI) Testing
- Responsiveness: Check your store on various devices (smartphones, tablets, PCs) and screen resolutions to ensure the site is responsive and elements adjust correctly.
- Browser Compatibility: Test your store on multiple browsers (Chrome, Firefox, Safari, Edge) to ensure consistency in appearance and functionality.
- Loading Times: Use tools like ‘Google PageSpeed Insights’ to check your site’s loading times and optimize any slow-loading elements.
Performance Testing
- Stress Testing: Use tools to simulate high traffic on your site and see how it handles heavy loads, identifying any potential bottlenecks.
- Speed Testing: Tools like ‘GTmetrix’ can help you analyze your site’s speed and recommend optimizations.
Security Testing
- SSL Certification: Ensure your site is SSL certified, which is crucial for secure connections and trustworthiness.
- Payment Gateway Security: Test the security of your payment gateways by checking for secure, encrypted transactions and compliance with PCI DSS standards.
SEO and Analytics
- SEO Optimization: Use tools like ‘Google’s SEO Checker’ to ensure your site is optimized for search engines, including meta tags, alt texts for images, and proper URLs.
- Analytics: Set up tools like ‘Google Analytics’ and ensure they correctly track visits, bounce rates, and other essential metrics.
Compliance and Accessibility
- Legal Compliance: Verify that your store complies with local laws and regulations, including GDPR in Europe, CCPA in California, and any specific requirements for your industry.
- Accessibility: Use tools and checklists to ensure your site is accessible to people with disabilities, following WCAG guidelines.
Shopify App Testing
This section will discuss how to test Shopify Apps (customized or standalone), Shopify Functions, and Shopify Webhooks.
For Shopify Stores (Custom Apps or Customizations)
Shopify stores can be customized with themes and extended with apps. Customizing a Shopify store mainly involves using themes and apps from the Shopify App Store. Below are the steps that will be required to test them:
Step 1: Setting Up the Testing Environment
- For Liquid templates or custom front-end code, consider using Jest for JavaScript testing. There’s no direct testing framework for Liquid, so any testing would focus on the JavaScript functionality or server-side code written in Ruby or another backend language that interacts with Shopify’s API.
- For backend logic (like Ruby or Node.js apps interacting with Shopify’s API), set up a testing framework appropriate for the language, such as RSpec (Ruby) or Mocha/Chai (Node.js).
Step 2: Mocking Shopify API Calls
To mock Shopify API responses, utilize libraries like Nock (for Node.js) or WebMock (for Ruby). This is crucial for ensuring your unit tests run in isolation without requiring actual API calls to Shopify.
Step 3: Writing Test Cases
- Identify all functions and components that constitute the smallest testable parts of your application.
- Write test cases for each function, covering all potential use cases, including success, failure, and edge cases.
- Ensure you mock external dependencies, like Shopify API calls, so that your tests focus solely on the component’s logic.
Here is an article on how to write test cases with examples.
Step 4: Running Tests and Refining Code
- Run your tests using the command line or a CI/CD tool.
- Analyze test results and refine your code as needed. Ensure that all tests pass before considering a feature complete.
For Standalone Shopify Apps
Shopify standalone apps are applications developed using Shopify’s APIs that add specific functionalities or extend the capabilities of Shopify stores. Software developers build standalone apps targeting store owners who need particular functionalities that Shopify does not provide out-of-the-box. Below are the steps that will be required to test them:
Step 1: Choose a Testing Framework
Based on your app’s stack, choose a testing framework. For instance, use RSpec for Ruby (Rails) apps, Jest for React or Node.js apps, or PHPUnit for PHP apps.
Step 2: Mocking External Services
Use mocking libraries to simulate Shopify API responses and any other external services your app interacts with. This allows you to verify that your app can gracefully handle various data and error conditions.
Step 3: Testing App Components
- Break down your app into individual units or components, such as models, services, and helpers.
- Write tests for each component, focusing on logic and behavior rather than integration points.
- Use fixtures or factories to create test data when necessary.
Step 4: Continuous Integration (CI)
Integrate your testing suite with a CI/CD service like GitHub Actions, GitLab CI/CD, or CircleCI. This ensures tests are automatically run on every commit, helping catch issues early.
For Shopify Functions
Shopify Functions is a powerful feature allowing developers to customize core aspects of a Shopify store’s behavior, including checkout, discounts, and payment methods, through custom code. These functions’ extension targets inject code into Shopify’s backend logic.
For example, developers might create and deploy an app with a function and a volume-based discount. Where the discount percentage increases based on the number of items a customer buys. If you buy 5-9 items, get a 5% discount; for 10-14 items, get a 15% discount; and for more items, get a 20% discount.
Below are the steps you would use to test the Shopify function before you deploy it:
Step 1: Use Shopify CLI for Development and Testing
Shopify CLI (Command Line Interface) is essential for developing and testing Shopify Functions. It allows you to create, test, and deploy your functions directly from your local development environment.
- Install Shopify CLI: Ensure you have the latest version of Shopify CLI installed on your development machine.
- Start with Example Functions: Shopify CLI provides example functions that can be used as a starting point for development and testing.
Step 2: Write Unit Tests
Unit testing involves isolating the smallest parts of your code: individual functions and methods or code fragments.
- Select a Testing Framework: Choose an appropriate testing framework depending on your development language. For JavaScript/TypeScript, Jest is a popular choice.
- Mock Shopify API Calls: Use mocking libraries to simulate Shopify API responses. This allows you to test how your function handles different data and scenarios without making actual API calls.
- Test Various Scenarios: Include tests for all possible use cases, including success, failure, and edge cases, to ensure your function behaves as expected under different conditions.
Step 3: Perform Integration Testing
Integration tests verify that your Shopify Function works as expected within the Shopify ecosystem and interacts correctly with other parts of Shopify.
- Test in a Development Store: Use a Shopify development store to deploy and test your function in a real Shopify environment. This helps ensure your function interacts correctly with Shopify’s APIs, the checkout process, and other Shopify features.
- Use Shopify’s Developer Tools: Utilize tools provided by Shopify, such as the ‘Theme Kit’ or ‘Shopify Admin API’, to simulate real-world scenarios and test your function’s integration with Shopify’s platform.
Step 4: Conduct End-to-End Testing
End-to-end testing simulates real user scenarios from start to finish, ensuring the entire process works as expected.
- Automate User Flows: Tools like Cypress or Selenium can automate browser actions to simulate how a real user would interact with your function through the store’s front end. However, these tools are not modern and cause more hassles than support. There are intelligent choices available, and we will know about them later in this article.
- Test on Multiple Devices and Browsers: Ensure your function works correctly across different devices and browsers, considering variations in screen size, operating systems, and browser capabilities.
For Shopify Webhooks
Shopify webhooks are a powerful feature that allows developers to receive real-time HTTP POST requests to a specified URL when specific events happen in a Shopify store. This enables external services or applications to react almost instantly to events such as order creations, product updates, or customer registrations, facilitating various integrations and automation.
You can set up webhooks from the Shopify admin under Settings > Notifications > Webhooks, through the Shopify API, or using the Shopify CLI for development purposes. Testing webhooks is an essential part of developing and integrating Shopify applications.
Here’s how to test Shopify webhooks effectively:
Step 1: Use a Request Bin or Webhook Tester Tool
Tools like ‘Webhook.site’ or ‘RequestBin’ provide unique URLs that you can use as webhook endpoints. They capture the requests sent to these URLs, allowing you to inspect the payloads and headers. This is a quick way to see precisely what Shopify is sending without setting up a server.
Step 2: Local Development
For local development, tools like ‘ngrok’ or ‘localtunnel’ can expose your local server to the internet with a publicly accessible URL. You can use this URL as your webhook endpoint in Shopify, allowing you to develop and test webhook handling logic on your local machine.
Example in ngrok: After starting ngrok, it provides a URL like http://12345678.ngrok.io. Use this as your webhook URL in Shopify’s admin or API settings.
Step 3: Write Logging or Callback Functions
Implement logging for incoming requests when setting up your webhook receiver endpoint. This can help you verify that the payload is as expected and that your endpoint processes the data correctly.
Step 4: Automate Testing
Consider using automated testing frameworks to simulate webhook events and ensure your application responds correctly. This can be part of your CI/CD pipeline.
Step 5: Use Shopify CLI for Development
Shopify CLI allows developers to quickly create and register webhooks with a development store. It can streamline the process of testing webhooks during development.
Step 6: Responding to Webhooks
Ensure your endpoint responds to Shopify webhooks promptly, preferably with a ‘200 OK’ status code. Shopify expects a response within 5 seconds; otherwise, it considers the delivery failed and will retry.
Step 7: Security Checks
Implement security checks in your webhook handler, such as verifying the webhook signature to ensure that the webhook is indeed coming from Shopify. This involves calculating a digital signature using the payload and your webhook secret, then comparing it to the signature sent by Shopify in the header.
How testRigor Can Help?
If you want to test all the aspects mentioned above of the Shopify Store or Apps, doing it manually may require time and effort. Employing automation testing tools can help execute repetitive and mundane tasks. Using traditional test automation tools may need additional coding and debugging, which is unsuitable.
Intelligent test automation tools such as testRigor can save a lot of time, effort, and cost. It is a generative AI-powered tool that supports test creation in plain English. If you are a small or medium-scale business and do not want a separate QA team for testing, this automation tool works well for you. Suppose you are a large-scale business that wants to use the cutting-edge latest AI-powered technology and automate complex scenarios. In that case, testRigor can help you save time through its simplicity, scalability, and robustness.
Here are a few testRigor features that will help you simplify the Shopify testing:
Create Tests in Plain English
enter "Gucci Bags" into "Search"
press enter
click "G MARMONT SMALL TOTE"
click "Shop Now"
AI-powered testRigor Locators
The platform uses advanced AI to identify elements on a webpage, reducing the reliance on specific locators like IDs or XPaths that may change over time. This robust element identification ensures that tests are less brittle and more resistant to minor UI changes, which is crucial for continuously evolving Shopify stores and apps.
Cross-Browser and Cross-Device Testing
testRigor supports testing across multiple browsers and devices, ensuring that Shopify stores provide a consistent and optimized user experience regardless of how customers access the site. Cross-compatibility testing is essential for e-commerce platforms catering to a wide audience.
Automate Regression Testing
Automated regression tests can be easily set up to ensure that new changes to Shopify stores, apps, or functions do not break existing functionalities. testRigor can execute these tests at scale, covering a broad spectrum of scenarios with each deployment, which is vital for the agile development cycles typical in e-commerce platforms.
Integrate with CI/CD Pipelines
testRigor integrates with CI/CD pipelines, allowing automated tests to run as part of the continuous integration process. This feature supports a DevOps approach, enabling rapid development, testing, and deployment of updates to Shopify stores and apps.
Visual Testing
Visual testing is supported by testRigor, which can detect unintended visual changes in Shopify stores. This is particularly useful for ensuring that UI elements are rendered correctly across different devices and browsers.
Automate Complex Scenarios
call api get "https://jsonplaceholder.typicode.com/users/10" with headers "Content-Type:application/json" and "Accept:application/json" and get "$..catchPhrase" and save it as "searchWord" and then check that http code is 200
testRigor lets you test web, mobile (hybrid, native), desktop, and API singlehandedly using AI and plain English commands. Read about testRigor’s top features.
How to do End-to-end Testing with testRigor
Let us take the example of an e-commerce website that sells plants and other gardening needs. We will create end-to-end test cases in testRigor using plain English test steps.
Step 1: Log in to your testRigor app with your credentials.
Step 2: Set up the test suite for the website testing by providing the information below:
- Test Suite Name: Provide a relevant and self-explanatory name.
- Type of testing: Select from the following options: Desktop Web Testing, Mobile Web Testing, Native and Hybrid Mobile, based on your test requirements.
- URL to run test on: Provide the application URL that you want to test.
- Testing credentials for your web/mobile app to test functionality which requires user to login: You can provide the app’s user login credentials here and need not write them separately in the test steps then. The login functionality will be taken care of automatically using the keyword
login. - OS and Browser: Choose the OS Browser combination on which you want to run the test cases.
- Number of test cases to generate using AI: If you wish, you can choose to generate test cases based on the App Description text, which works on generative AI.
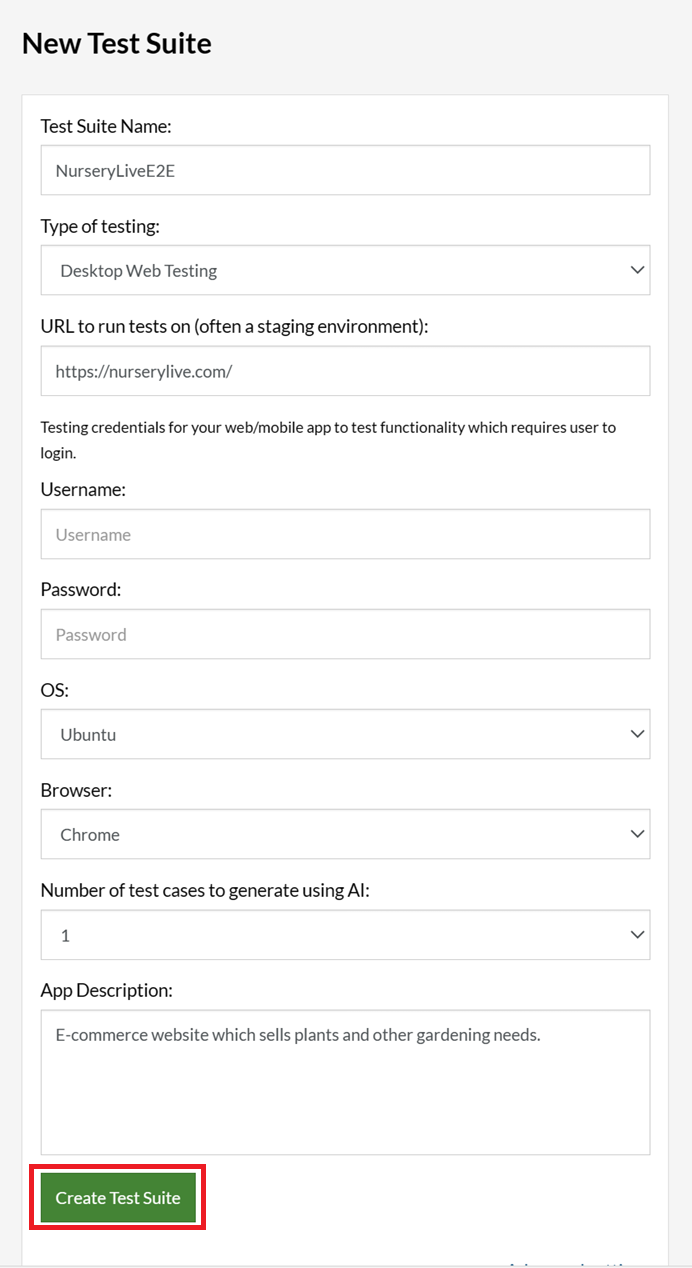
Step 3: Click Create Test Suite.
On the next screen, you can let AI generate the test case based on the App Description you provided during the Test Suite creation. However, for now, select do not generate any test, since we will write the test steps ourselves.
Step 4: To create a new custom test case yourself, click Add Custom Test Case.

Step 5: Provide the test case Description and start adding the test steps.
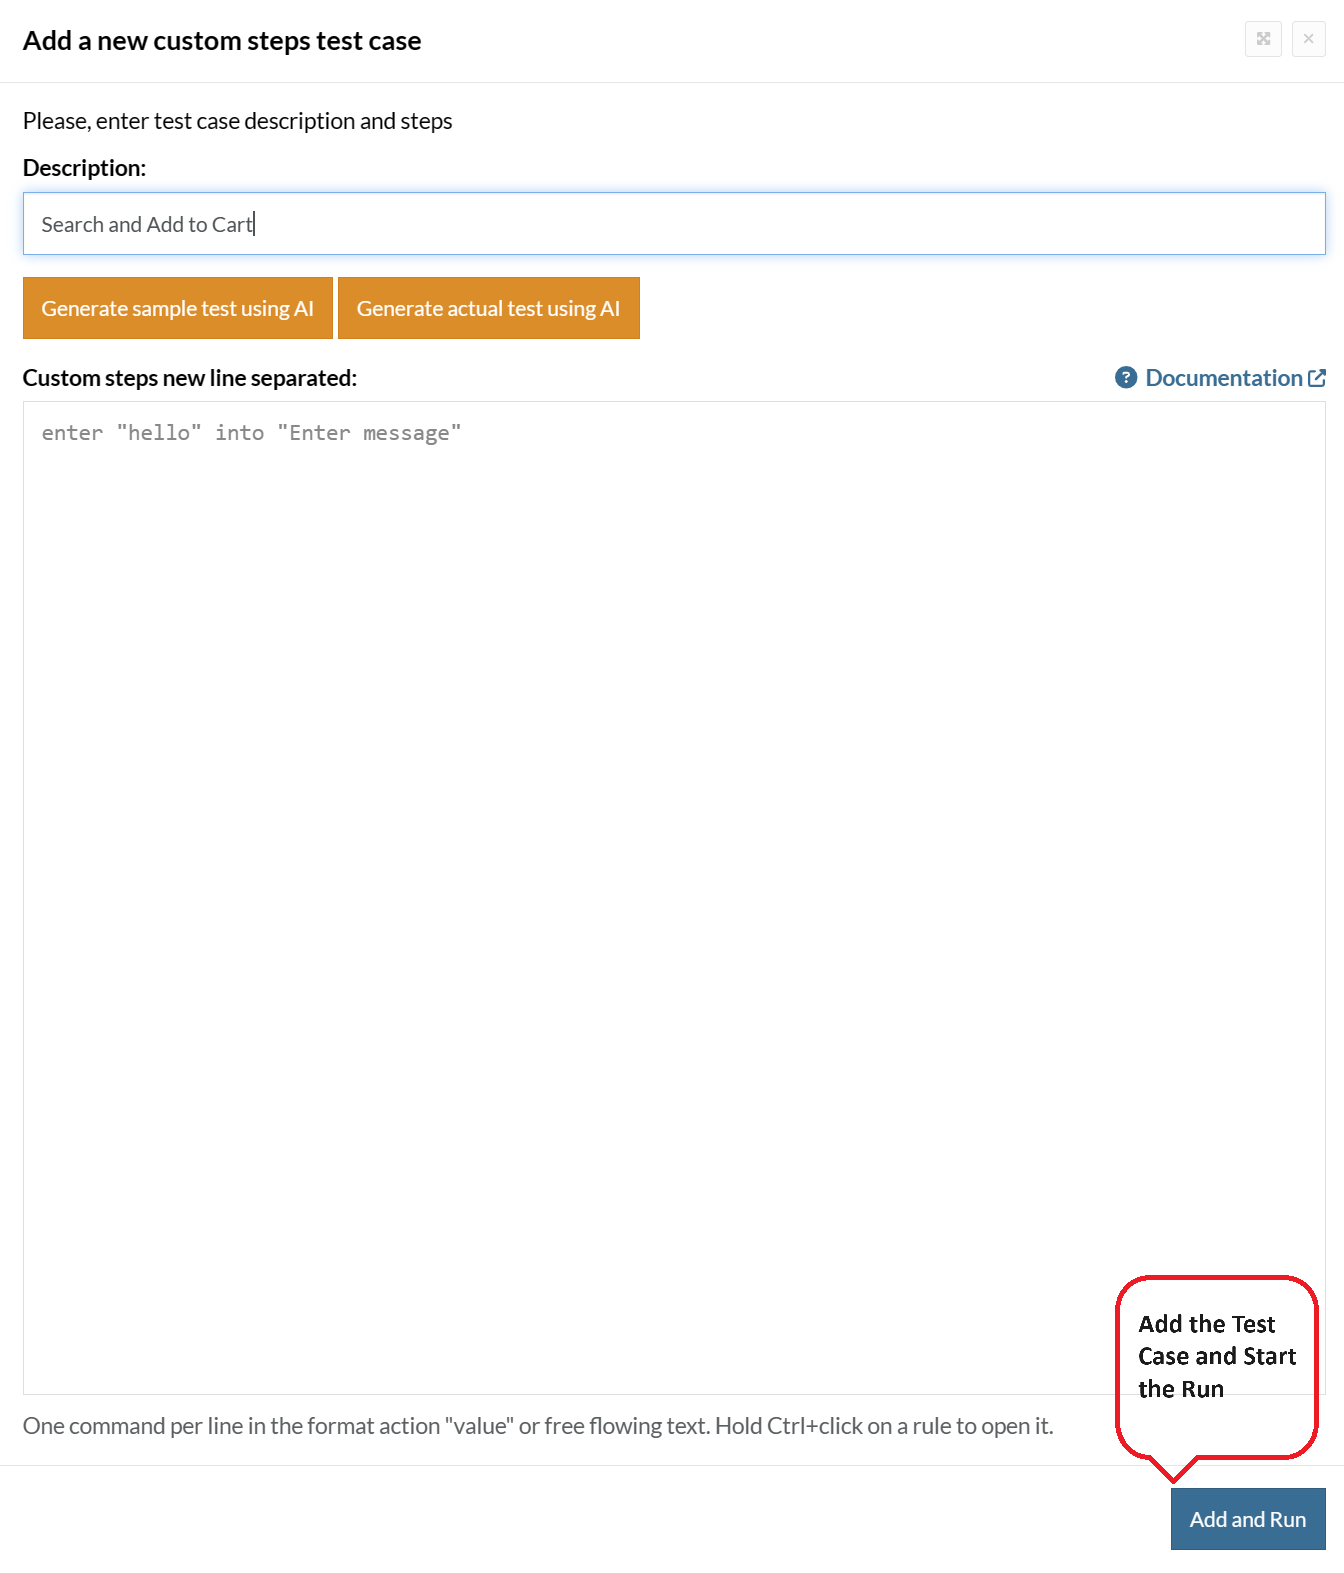
For the application under test, i.e., e-commerce website, we will perform below test steps:
- Search for a product
- Add it to the cart
- Verify that the product is present in the cart
Test Case: Search and Add to Cart
Step 1: We will add test steps on the test case editor screen one by one.
testRigor automatically navigates to the website URL you provided during the Test Suite creation. There is no need to use any separate function for it. Here is the website homepage, which we intend to test.

First, we want to search for a product in the search box. Unlike traditional testing tools, you can identify the UI element using the text you see on the screen. You need not use any CSS/XPath identifiers.
click "What are you looking for?"
Step 2: Once the cursor is in the search box, we will type the product name (lily), and press enter to start the search.
type "lily"
enter enter
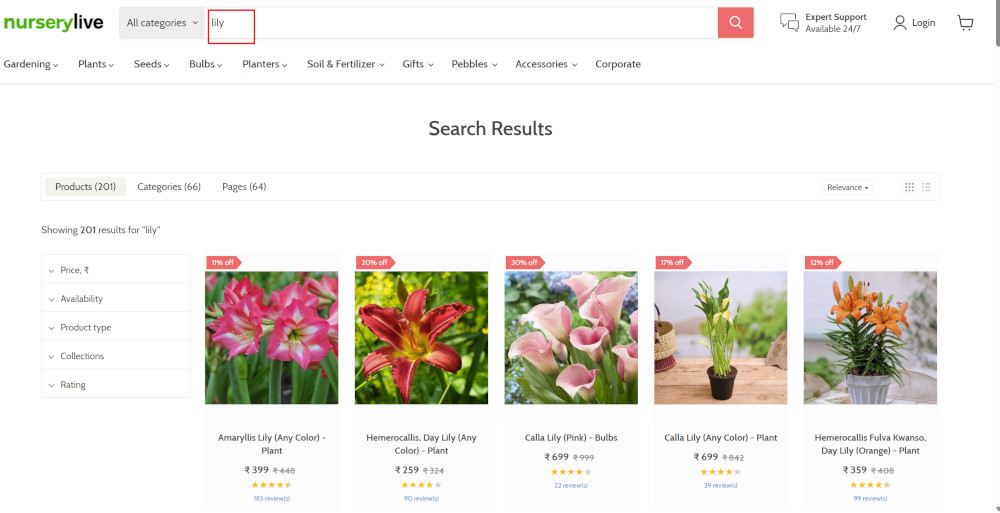
Search lists all products with the “lily” keyword on the webpage.
Step 3: The lily plant we are searching for needs the screen to be scrolled; for that testRigor provides a command. Scroll down until the product is present on the screen:
scroll down until page contains "Zephyranthes Lily, Rain Lily (Red)"
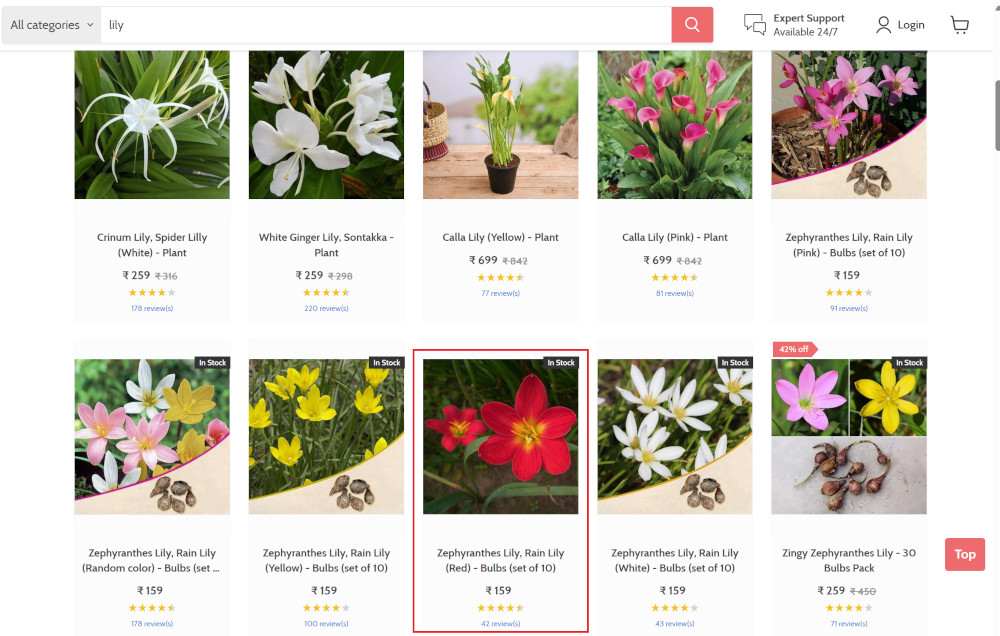
When the product is found on the screen, testRigor stops scrolling.
Step 4: Click on the product name to view the details:
click "Zephyranthes Lily, Rain Lily (Red)"
After the click, the product details are displayed on the screen as below, with the default Quantity as 1.
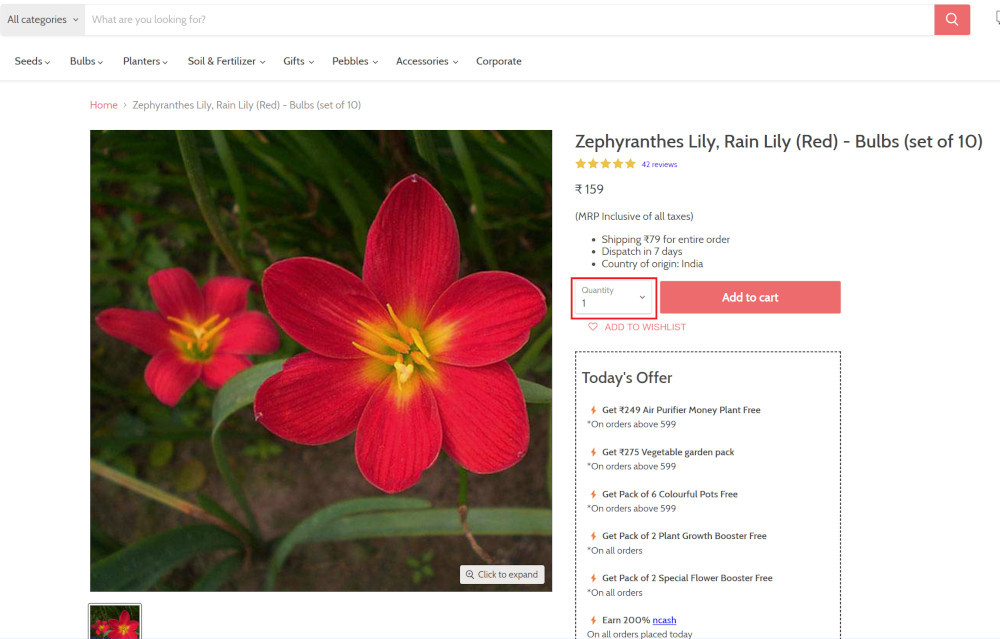
Step 5: Lets say, we want to change the Quantity to 3, so here we use the testRigor command to select from a list.
select "3" from "Quantity"
click "Add to cart"
The product is successfully added to the cart, and the “Added to your cart:” message is displayed on webpage.
Step 6: To assert that the message is successfully displayed, use a simple assertion command as below:
check that page contains "Added to your cart:"
Step 7: After this check, we will view the contents of the cart by clicking View cart as below:
click "View cart"

Step 8: Now we will again check that the product is present in the cart, under heading “Your cart” using the below assertion. With testRigor, it is really easy to specify the location of an element on the screen.
check that page contains "Zephyranthes Lily, Rain Lily (Red)" under "Your cart"

Complete Test Case
Here is how the complete test case will look in the testRigor app. The test steps are simple in plain English, enabling everyone in your team to write and execute them.
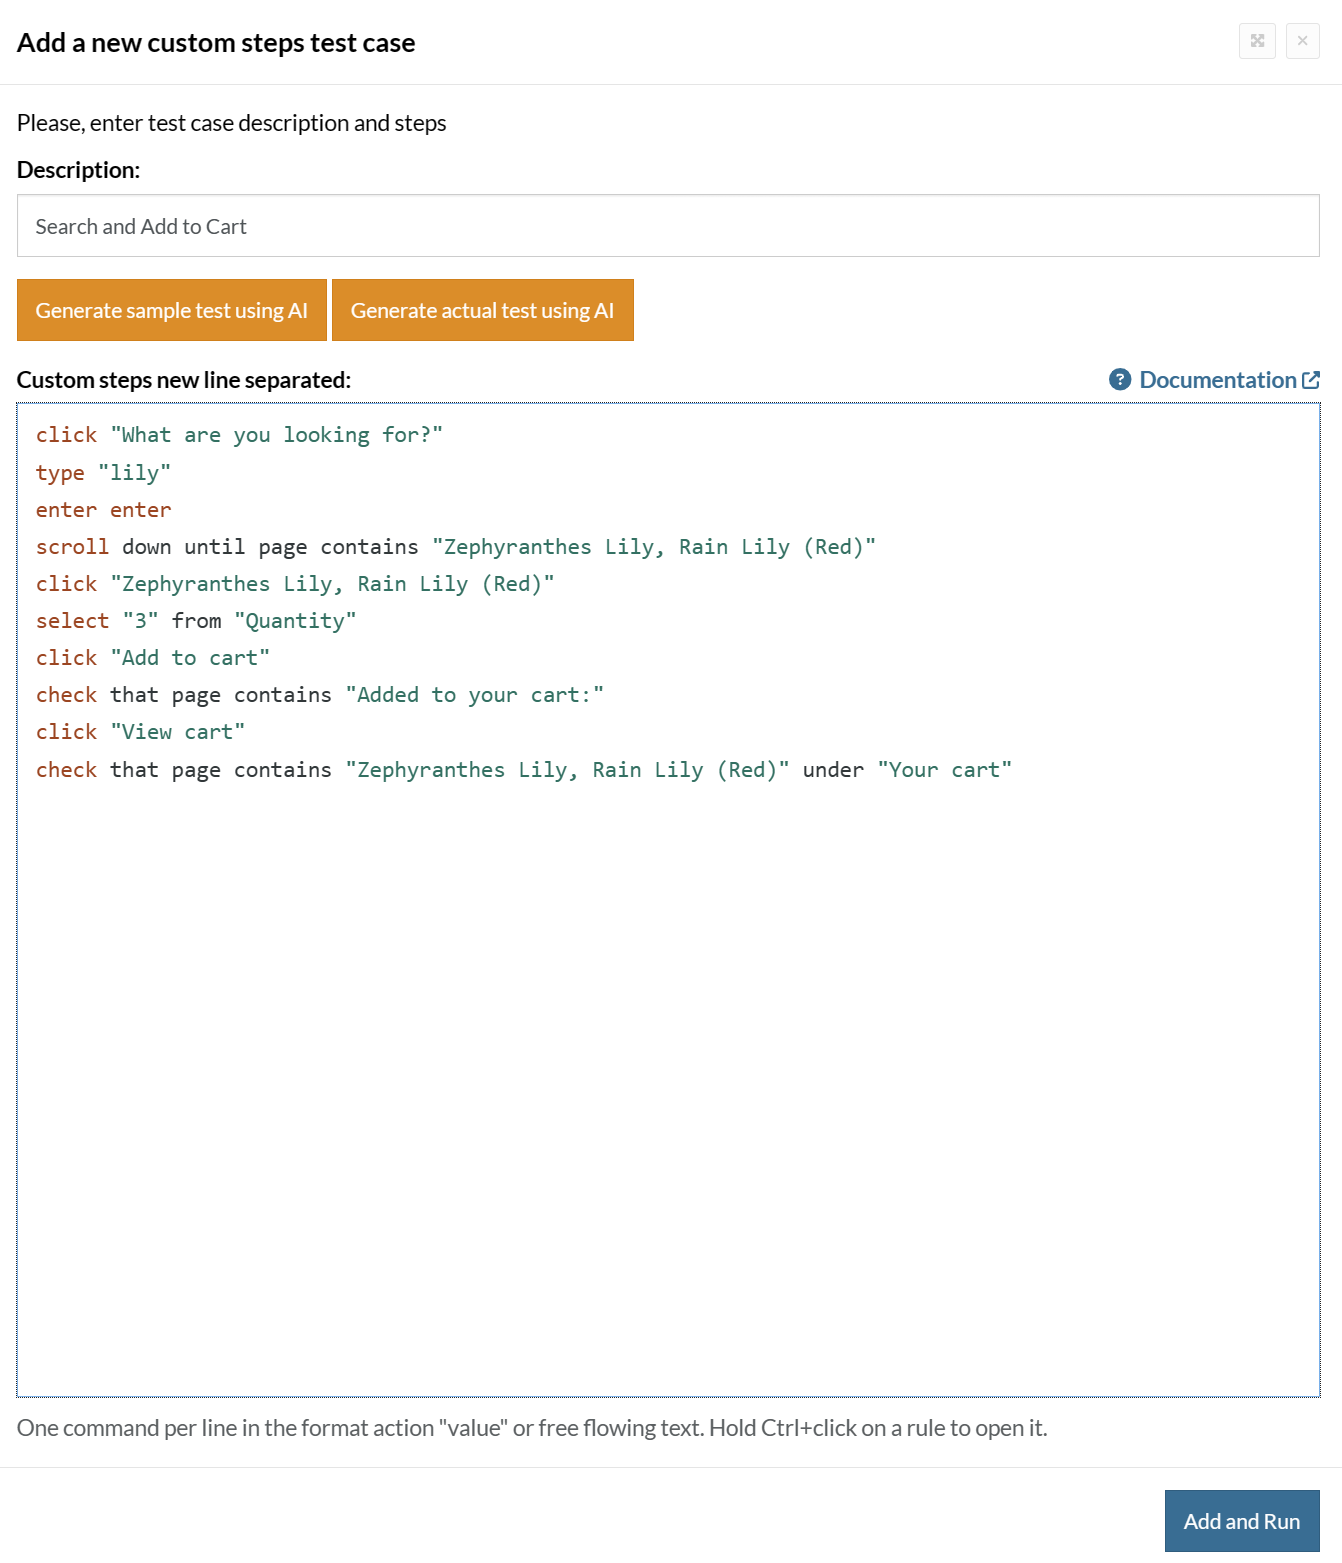
Click Add and Run.
Execution Results
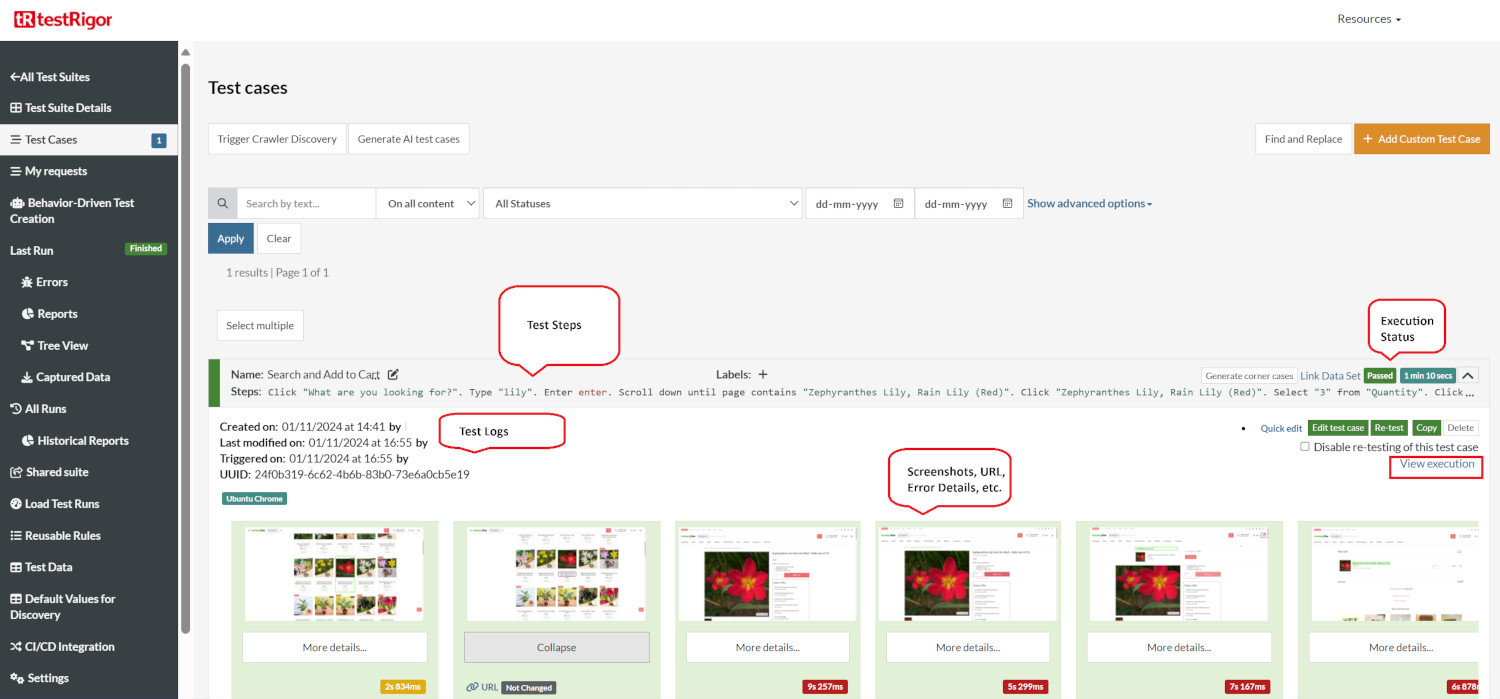
Once the test is executed, you can view the execution details, such as execution status, time spent in execution, screenshots, error messages, logs, video recordings of the test execution, etc. In case of any failure, there are logs and error text that are available easily in a few clicks.
You can also download the complete execution with steps and screenshots in PDF or Word format through the View Execution option.
testRigor’s Capabilities
Apart from the simplistic test case design and execution, there are some advanced features that help you test your application using simple English commands.
- Reusable Rules (Subroutines): You can easily create functions for the test steps that you use repeatedly. You can use the Reusable Rules to create such functions and call them in test cases by simply writing their names. See the example of Reusable Rules.
- Global Variables and Data Sets: You can import data from external files or create your own global variables and data sets in testRigor to use them in data-driven testing.
- 2FA, QR Code, and Captcha Resolution: testRigor easily manages the 2FA, QR Code, and Captcha resolution through its simple English commands.
- Email, Phone Call, and SMS Testing: Use simple English commands to test the email, phone calls, and SMS. These commands are useful for validating 2FA scenarios, with OTPs and authentication codes being sent to email, phone calls, or via phone text.
- File Upload/ Download Testing: Execute the test steps involving file download or file upload without the requirement of any third-party software. You can also validate the contents of the files using testRigor’s simple English commands.
- Database Testing: Execute database queries and validate the results fetched.
testRigor enables you to test web, mobile (hybrid, native), API, and desktop apps with minimum effort and maintenance.
Additional Resources
- Access testRigor documentation to know about more useful capabilities
- Top testRigor’s features
- How to perform end-to-end testing
Additional Resources
-
Shopify’s documentation:
- Shopify payment testing
- Create test orders
- Evaluate site speed
- How to do End-to-end Testing with testRigor?
- How to Build an ADA-compliant App?
Conclusion
Thorough testing of Shopify Stores and Apps is critical since the whole business and sales depend on these. Any lag or defect may cause customers to switch to another merchant/business. Hence, it is necessary to seek the help of the leading test automation tools to keep sales high and the business growing.
Intelligent and innovative AI agents such as testRigor simplify automating the testing of Shopify stores and apps, making it accessible and efficient for businesses of all sizes. Whether you are a small-scale business looking to streamline your testing process without a dedicated QA team or a large-scale enterprise seeking to utilize the latest in AI-powered technology, in both cases, testRigor offers a solution that is time-saving, quality-yielding, and cost-effective.
| Achieve More Than 90% Test Automation | |
| Step by Step Walkthroughs and Help | |
| 14 Day Free Trial, Cancel Anytime |


