Slack Testing
|
|
Slack has become a fundamental tool for many organizations worldwide for enhancing collaboration and productivity across various industries. You can use this platform for messaging, file sharing, and integration with various third-party services and applications, from small teams to large enterprises.
Customizing Slack
Slack offers many out-of-the-box capabilities, yet you might require customizations to improve your system’s overall productivity. Through customization, you can extend the existing Slack product in the following ways.
- Custom integrations to make Slack products better suited to your existing system
- Developing apps for Slack App Directory
Slack offers a few different options for customizing the platform, and the programming language you will need depends on your chosen approach. Slack’s Bolt framework simplifies the process of building Slack apps. It provides built-in functions for handling authentication, making API calls, and dealing with Slack’s interactive components. It supports popular languages like JavaScript, Python, and Java.
If you prefer more control or need a language not supported by Bolt, you can directly interact with the Slack API. The API offers various libraries and SDKs to simplify development in several languages, including Python, JavaScript, Node.js, Java, Go, and C#. You can find official SDKs and various community libraries for these languages.
Slack’s App Directory
The Slack App Directory is accessible directly from Slack’s website or through the Slack app itself. It is an easy way to enhance your Slack workspace with additional capabilities tailored to your team’s needs. You can browse the App Directory by category or search for specific apps based on your needs. Once you find an app that interests you, Slack provides information on what it does, how to install it, and any permissions it requires.
You need to do the following to add apps to this App Directory.
Step 1: Develop your app using either Slack’s Bolt framework, official SDKs, or APIs. Ensure your app provides value to Slack users, adheres to Slack’s design guidelines, and follows best practices for security and user experience.
Step 2: Test your app thoroughly. More on this in further sections.
Step 3: Prepare for submission by reviewing Slack’s guidelines, complete your app’s listing for the directory, and prepare for security review.
Step 4: Submit your app for review by the Slack team. If Slack provides feedback on your submission, you may need to make revisions and resubmit your app.
Once approved, your app will be listed in the Slack App Directory. Remember that you’ll be responsible for managing your app’s listing, updating it as necessary, and supporting app users.
Testing Slack applications
Whether you’ve developed a customization for Slack to tailor it for your existing system or built an app for the App Directory, you need to test your code. There are various ways to go about this, but if you’re looking for a systematic approach, here are some suggestions.
If you’re familiar with the testing pyramid, you’ll know that you can test your code at three different levels.
- Unit testing
- Integration testing
- End-to-end testing
Additionally, you’ll also benefit from adding some non-functional testing to this approach through performance and security testing.
Unit testing
Unit testing Slack customizations, such as custom Slack apps or integrations, involves verifying the smallest parts of the application in isolation, like individual functions or methods, to ensure they work as expected. Hence, you must break down your Slack customization functionalities into smaller, testable units. These units could be individual functions, event listeners, or specific interactions within your app. Isolate your unit under test from external dependencies like the Slack API or databases.
Make use of unit testing frameworks to create test cases. Popular choices include Jest for JavaScript and pytest for Python. These frameworks provide tools for writing assertions, mocking dependencies, and running tests. Bolt offers built-in functionalities to simplify testing. You can use the @slack/test package to mock incoming events and user interactions. This allows you to test how your app responds to specific scenarios without needing a real Slack connection.
Integration testing
Integration testing of Slack customizations, such as apps or integrations, involves verifying that your customization works as expected within the Slack environment, including interactions with Slack’s APIs and any third-party services your app integrates with.
Here are some key aspects to consider during integration testing of your Slack customizations.
- API interactions: Verify that your customization interacts correctly with the Slack API. Test various scenarios like sending messages, fetching user data, or reacting to events. Ensure data is exchanged accurately and functionalities work as intended.
- External services: If your customization integrates with external services like databases or third-party APIs, test interactions with those services. Make sure data is sent and received correctly and error handling works appropriately.
- User interactions: Test how users interact with your customization. This might involve simulating user commands, button clicks, or form submissions. Ensure the app responds correctly to various user inputs and interactions.
Slack offers a development workspace where you can develop and test your code. This will help you protect your live data from any mishaps.
End-to-end testing
Unlike unit testing and integration testing, which test parts of the app in isolation, end-to-end testing assesses the app as a whole. Many tools in the market allow you to execute end-to-end tests. You might have heard of tools like Selenium and Cypress. However, they have their limitations, like dependency on coding, test maintenance overhead, steep learning curve, and more.
Instead, you can opt for a modern and better alternative that gives you the most with the least amount of hassle.
testRigor for end-to-end testing
testRigor is a no-code, AI-based test automation tool that gives you the best of test automation while dealing with all associated complexities by itself. With testRigor, you can automate end-to-end tests, functional tests, UI-based tests, acceptance tests, and even API tests. These tests can be run across multiple web, mobile, and desktop platforms.
A significant advantage of this tool over traditional test automation tools is that it lets you write test cases in plain English. It uses a generative AI engine to interpret English statements without requiring any coding from your end.
login as administrator
navigate to Appointments Dashboard
click on "settings"
check that page contains "schedule new appointments through Slack"
click on "Done"
You can create reusable rules (subroutines) that are like reusable methods that can be used across test cases. In the above example, the statement ‘login as administrator’ is a reusable rule. You can use plain English commands to define these single-line statements so that the particular operation can be done across test cases with just a single line instead of a series of statements.
With testRigor’s powerful library, you can simply automate various test scenarios, like interacting with table data, uploading files, verifying images, performing 2-factor authentication, and more. The use of AI does not end here. Along with simplified test creation, it also uses AI to reduce your test maintenance load through self-healing.
If your organization uses CI/CD, then integrate testRigor tests with the pipeline for regular testing. You can extend your testing framework with testRigor’s supported integrations with third-party tools and frameworks.
How to do End-to-end Testing with testRigor
Let us take the example of an e-commerce website that sells plants and other gardening needs. We will create end-to-end test cases in testRigor using plain English test steps.
Step 1: Log in to your testRigor app with your credentials.
Step 2: Set up the test suite for the website testing by providing the information below:
- Test Suite Name: Provide a relevant and self-explanatory name.
- Type of testing: Select from the following options: Desktop Web Testing, Mobile Web Testing, Native and Hybrid Mobile, based on your test requirements.
- URL to run test on: Provide the application URL that you want to test.
- Testing credentials for your web/mobile app to test functionality which requires user to login: You can provide the app’s user login credentials here and need not write them separately in the test steps then. The login functionality will be taken care of automatically using the keyword
login. - OS and Browser: Choose the OS Browser combination on which you want to run the test cases.
- Number of test cases to generate using AI: If you wish, you can choose to generate test cases based on the App Description text, which works on generative AI.
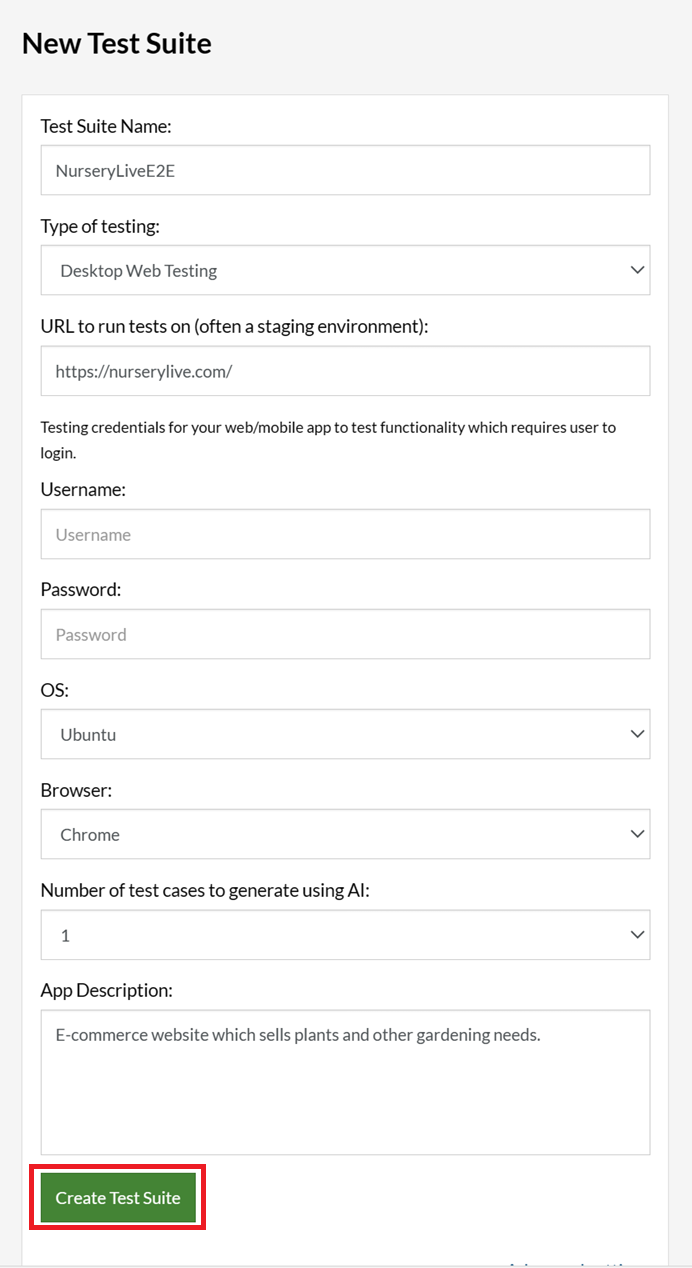
Step 3: Click Create Test Suite.
On the next screen, you can let AI generate the test case based on the App Description you provided during the Test Suite creation. However, for now, select do not generate any test, since we will write the test steps ourselves.
Step 4: To create a new custom test case yourself, click Add Custom Test Case.

Step 5: Provide the test case Description and start adding the test steps.
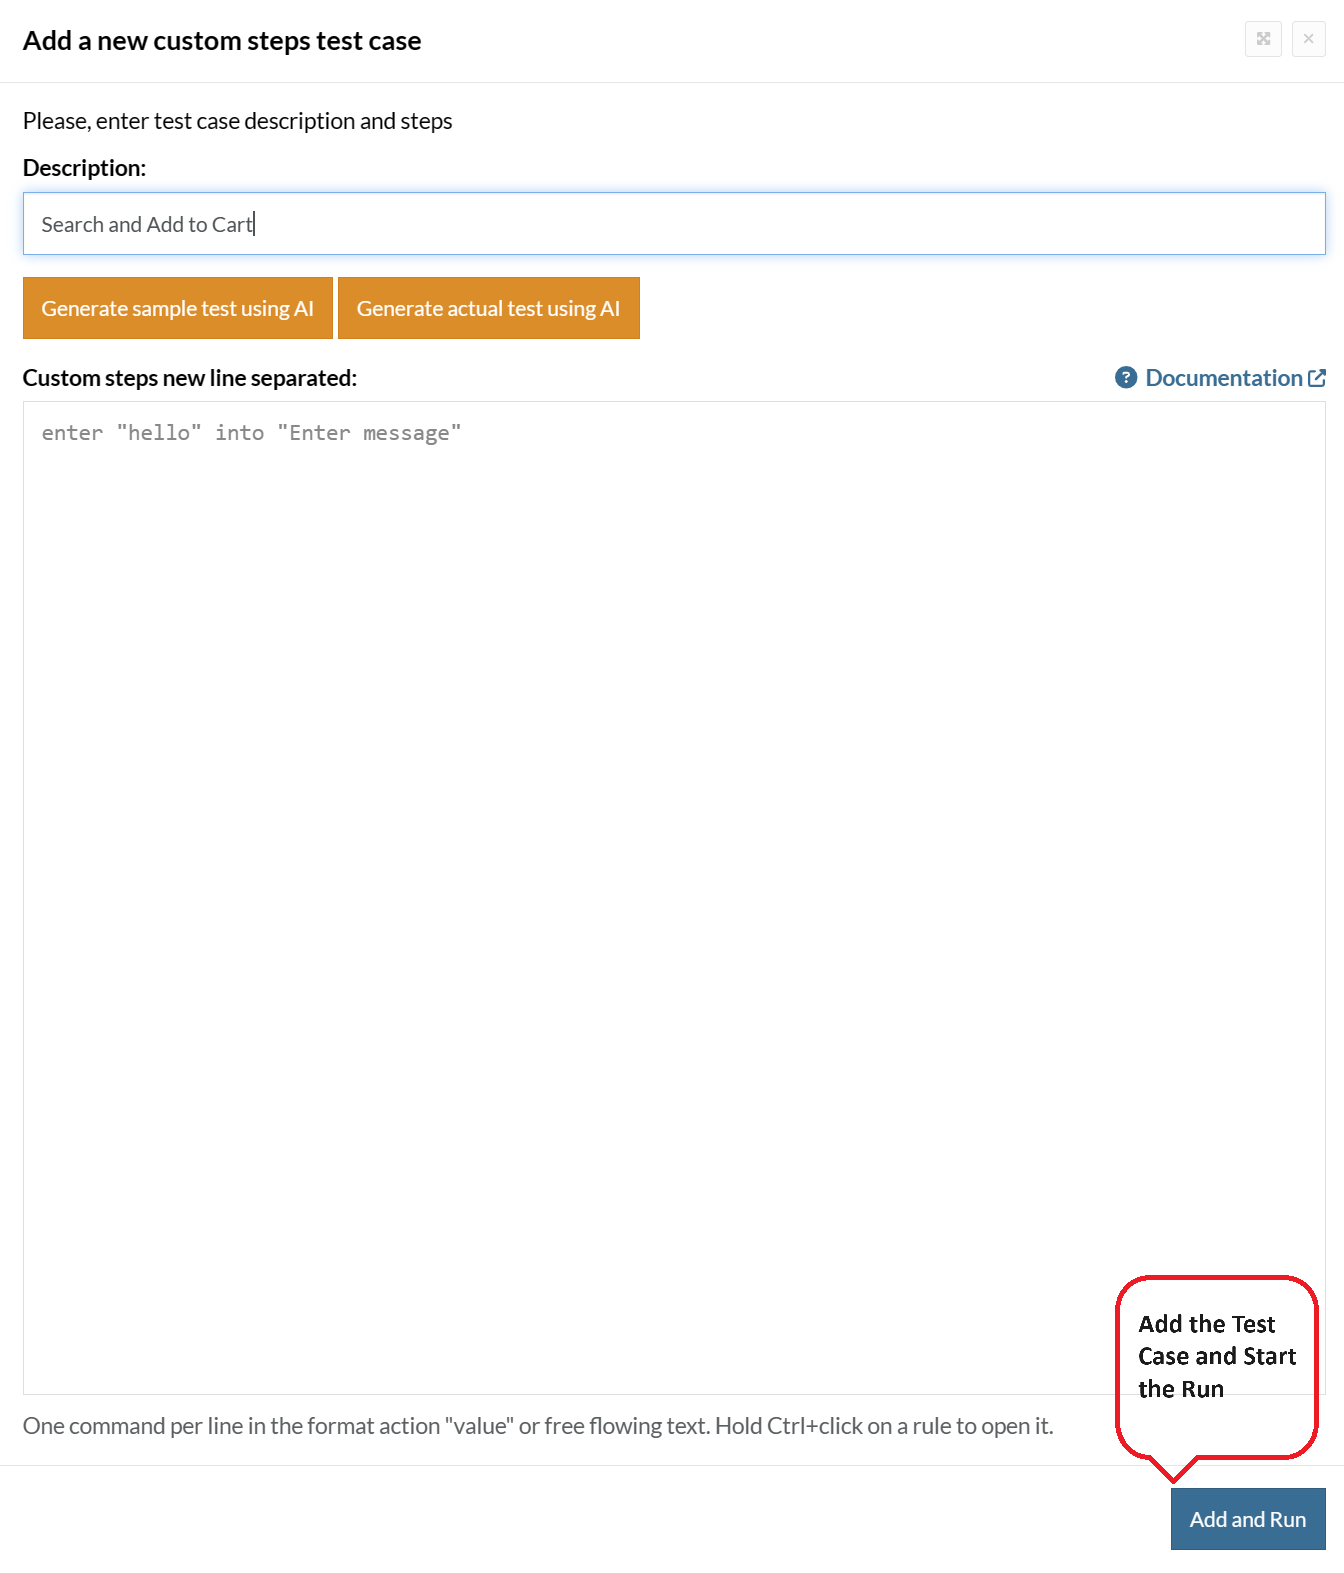
For the application under test, i.e., e-commerce website, we will perform below test steps:
- Search for a product
- Add it to the cart
- Verify that the product is present in the cart
Test Case: Search and Add to Cart
Step 1: We will add test steps on the test case editor screen one by one.
testRigor automatically navigates to the website URL you provided during the Test Suite creation. There is no need to use any separate function for it. Here is the website homepage, which we intend to test.

First, we want to search for a product in the search box. Unlike traditional testing tools, you can identify the UI element using the text you see on the screen. You need not use any CSS/XPath identifiers.
click "What are you looking for?"
Step 2: Once the cursor is in the search box, we will type the product name (lily), and press enter to start the search.
type "lily"
enter enter
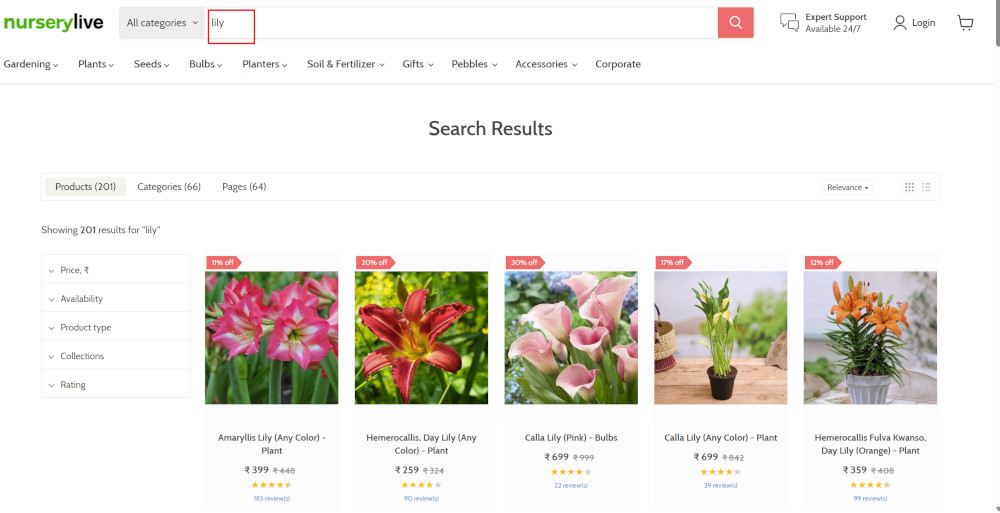
Search lists all products with the “lily” keyword on the webpage.
Step 3: The lily plant we are searching for needs the screen to be scrolled; for that testRigor provides a command. Scroll down until the product is present on the screen:
scroll down until page contains "Zephyranthes Lily, Rain Lily (Red)"
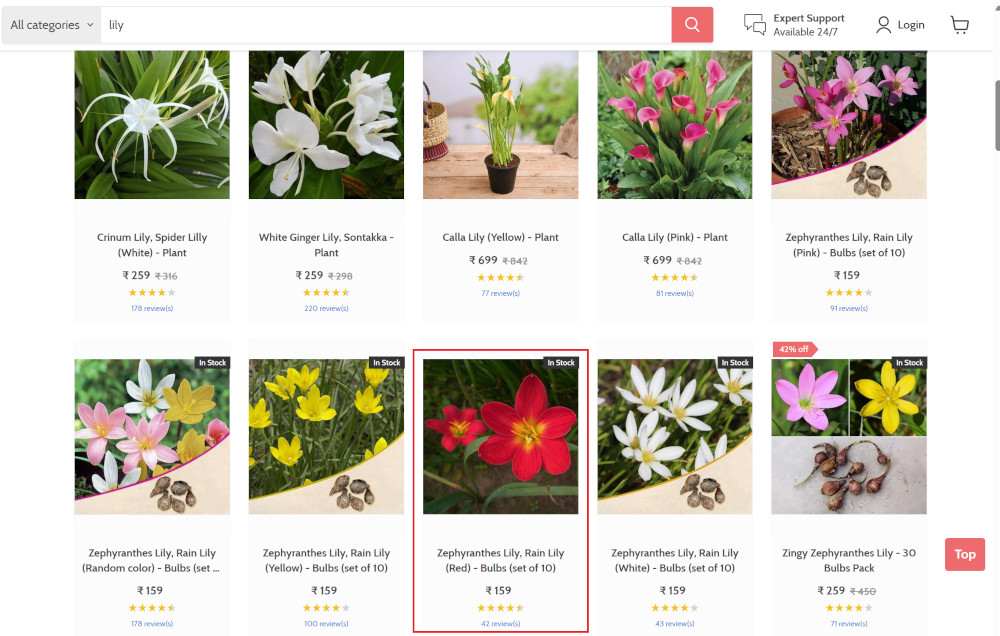
When the product is found on the screen, testRigor stops scrolling.
Step 4: Click on the product name to view the details:
click "Zephyranthes Lily, Rain Lily (Red)"
After the click, the product details are displayed on the screen as below, with the default Quantity as 1.
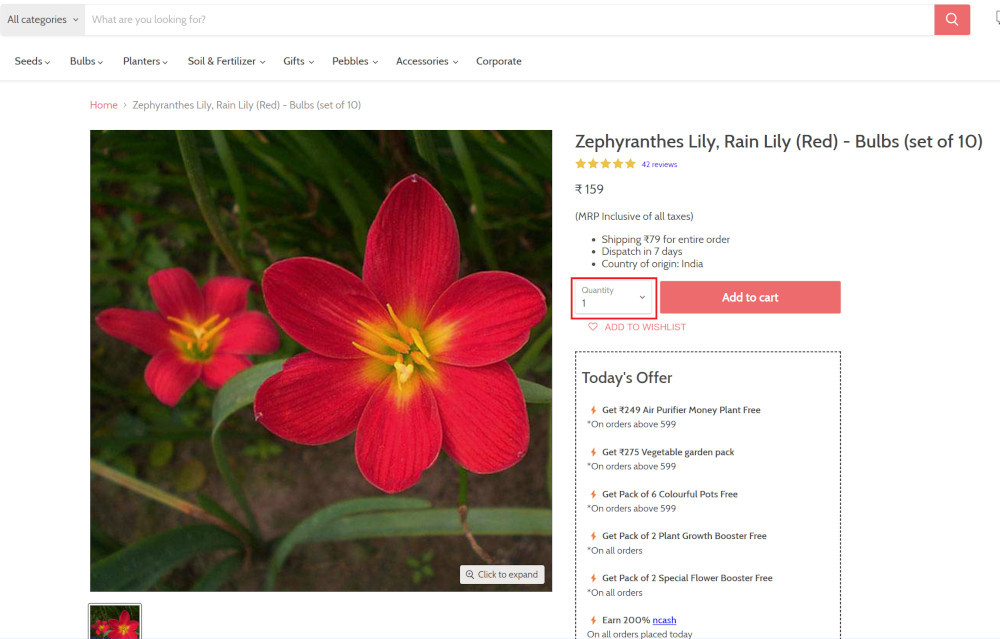
Step 5: Lets say, we want to change the Quantity to 3, so here we use the testRigor command to select from a list.
select "3" from "Quantity"
click "Add to cart"
The product is successfully added to the cart, and the “Added to your cart:” message is displayed on webpage.
Step 6: To assert that the message is successfully displayed, use a simple assertion command as below:
check that page contains "Added to your cart:"
Step 7: After this check, we will view the contents of the cart by clicking View cart as below:
click "View cart"

Step 8: Now we will again check that the product is present in the cart, under heading “Your cart” using the below assertion. With testRigor, it is really easy to specify the location of an element on the screen.
check that page contains "Zephyranthes Lily, Rain Lily (Red)" under "Your cart"

Complete Test Case
Here is how the complete test case will look in the testRigor app. The test steps are simple in plain English, enabling everyone in your team to write and execute them.
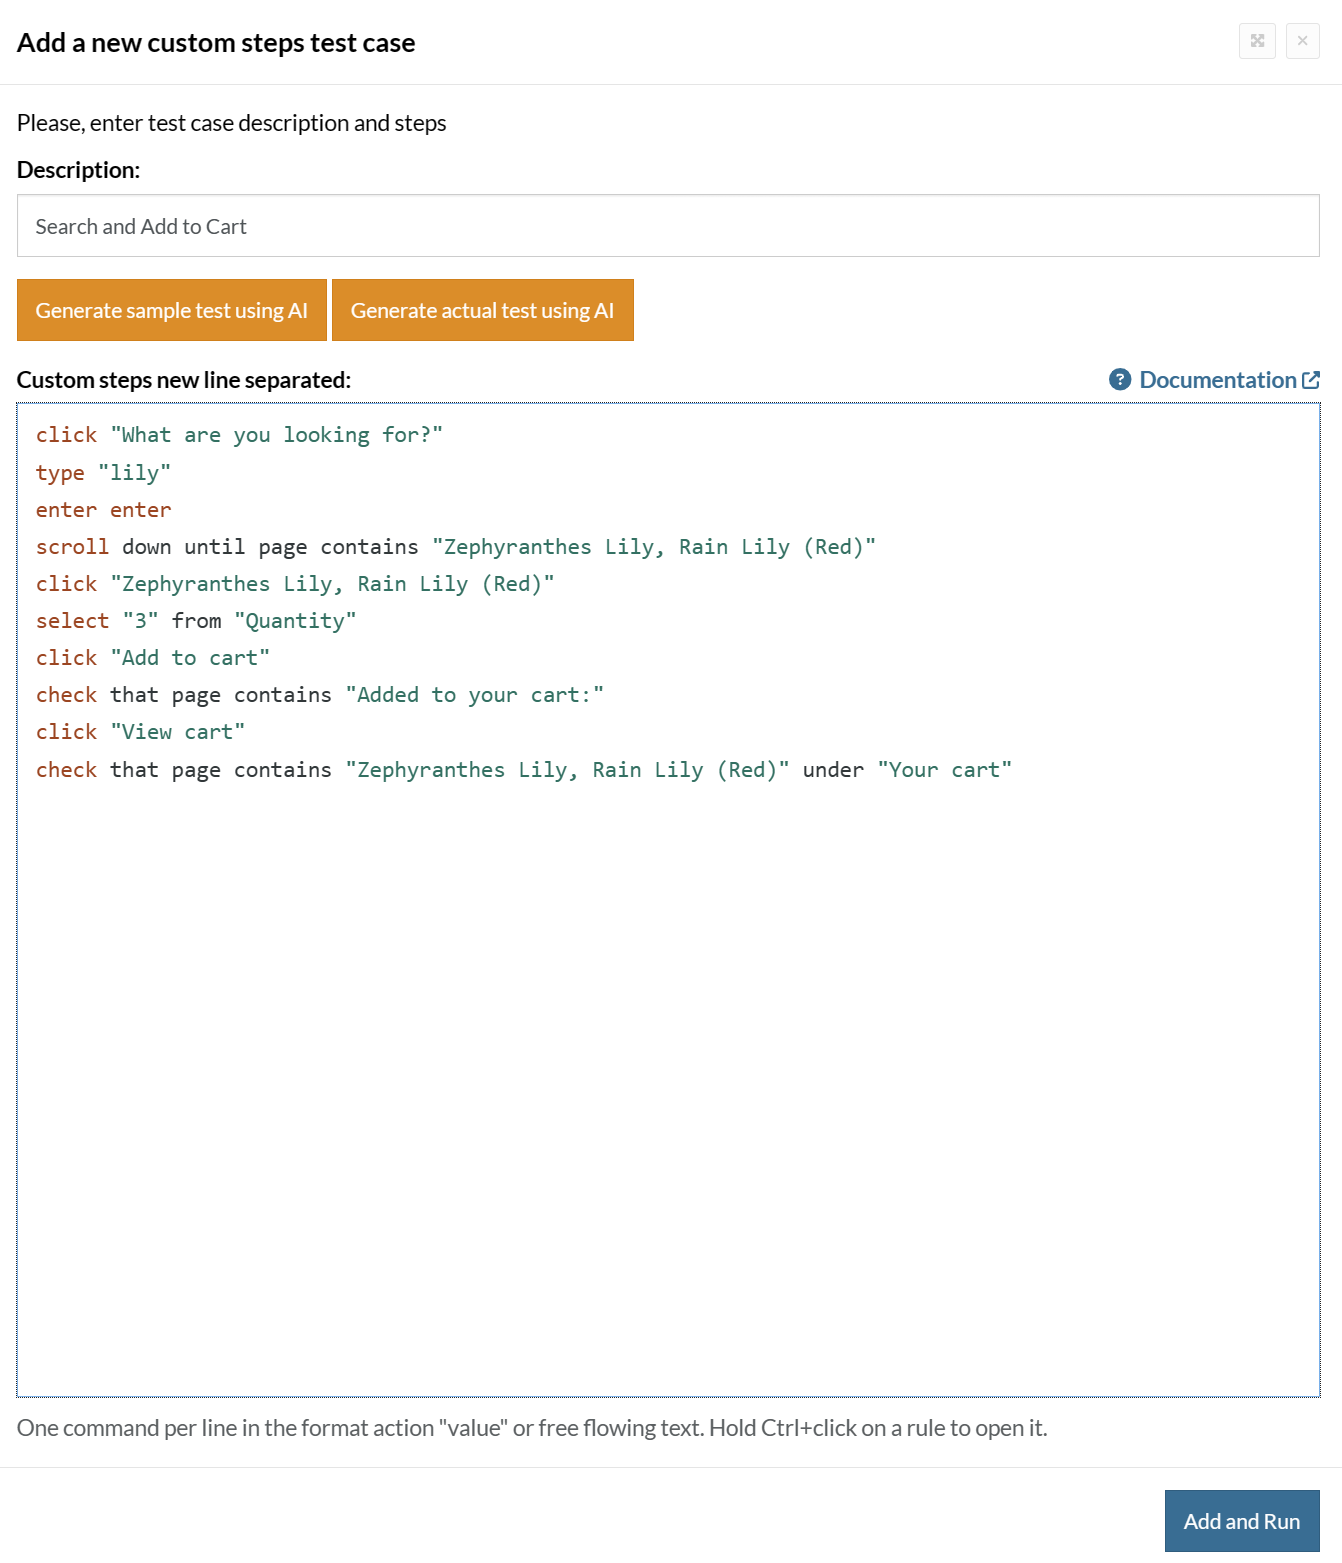
Click Add and Run.
Execution Results
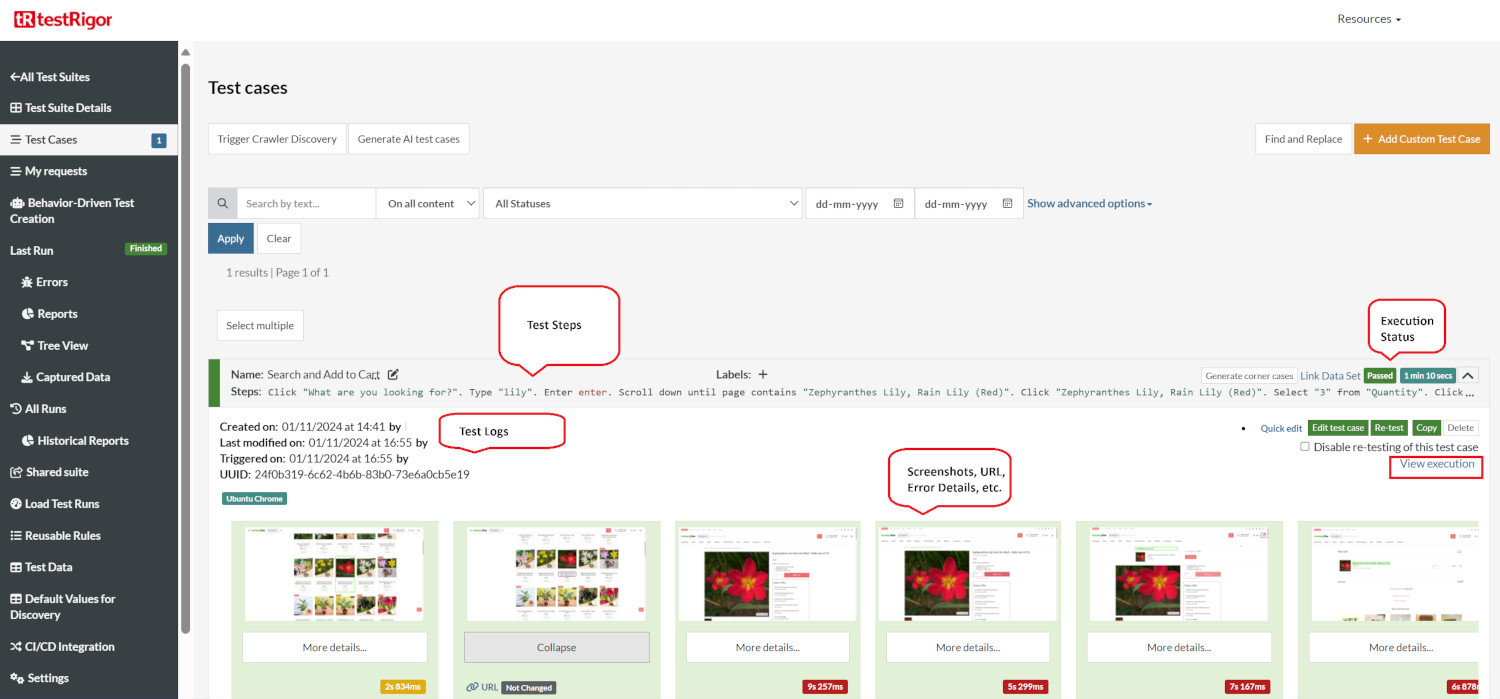
Once the test is executed, you can view the execution details, such as execution status, time spent in execution, screenshots, error messages, logs, video recordings of the test execution, etc. In case of any failure, there are logs and error text that are available easily in a few clicks.
You can also download the complete execution with steps and screenshots in PDF or Word format through the View Execution option.
testRigor’s Capabilities
Apart from the simplistic test case design and execution, there are some advanced features that help you test your application using simple English commands.
- Reusable Rules (Subroutines): You can easily create functions for the test steps that you use repeatedly. You can use the Reusable Rules to create such functions and call them in test cases by simply writing their names. See the example of Reusable Rules.
- Global Variables and Data Sets: You can import data from external files or create your own global variables and data sets in testRigor to use them in data-driven testing.
- 2FA, QR Code, and Captcha Resolution: testRigor easily manages the 2FA, QR Code, and Captcha resolution through its simple English commands.
- Email, Phone Call, and SMS Testing: Use simple English commands to test the email, phone calls, and SMS. These commands are useful for validating 2FA scenarios, with OTPs and authentication codes being sent to email, phone calls, or via phone text.
- File Upload/ Download Testing: Execute the test steps involving file download or file upload without the requirement of any third-party software. You can also validate the contents of the files using testRigor’s simple English commands.
- Database Testing: Execute database queries and validate the results fetched.
testRigor enables you to test web, mobile (hybrid, native), API, and desktop apps with minimum effort and maintenance.
Additional Resources
- Access testRigor documentation to know about more useful capabilities
- Top testRigor’s features
- How to perform end-to-end testing
- How to do file testing using testRigor?
- How to do email testing using testRigor?
- How to do API testing using testRigor?
- How to do desktop testing using testRigor?
- How to do audio testing using testRigor?
- How to do SMS, 2FA, and phone call testing using testRigor?
- How to do mobile testing using testRigor?
Conclusion
Slack is a great platform to improve the productivity and connectivity of your team. Since they allow customizations, it makes it an even better alternative than other competing platforms. Combine this with intelligent tools such as testRigor to help you focus the team’s time and effort on building robust tests, exploratory testing, and achieving good test coverage. It saves your team from maintaining, debugging, and updating the test script code now and then, thus delivering a quality product in less time and cost.
| Achieve More Than 90% Test Automation | |
| Step by Step Walkthroughs and Help | |
| 14 Day Free Trial, Cancel Anytime |


